Last updated Sep 28, 2023 3:13 PM
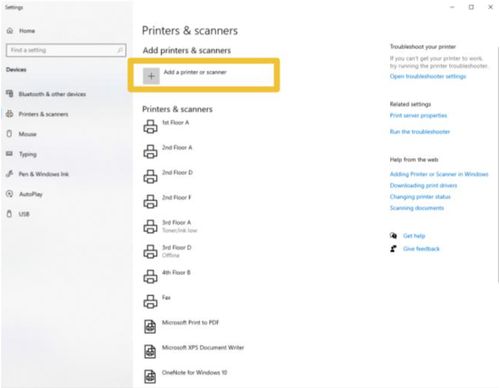
Building Printers
On This Page:
Printer Installation & Setup - Windows
NOTE: Before beginning, please ensure you are connected to the network via UCB Wireless or Ethernet connection.
- Please begin by downloading the print driver here.
- You can access the driver by opening the downloaded .zip file within File Explorer and opening the Downloads folder

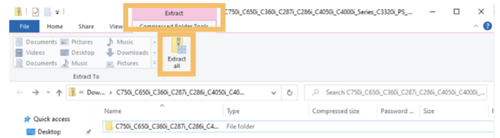
3. You will need to extract the file. First click the pink highlighted Extract on the top of the page.
Then, click Extract All.
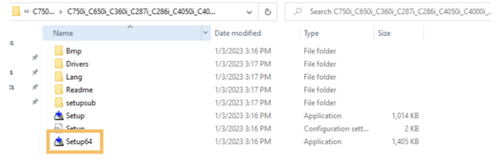
4. A new File Explorer window will open with the extracted files.
Double-click on Setup64.
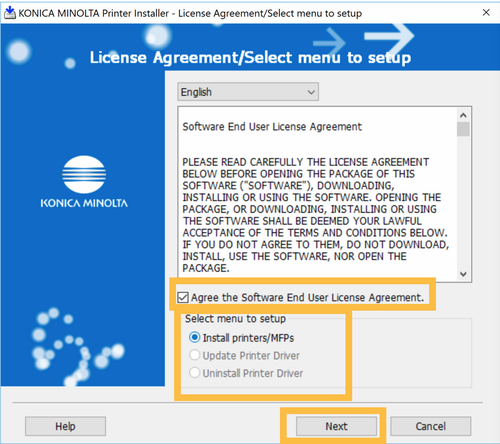
5. The driver installation window will then open.
Check the box next to Agree the Software End User License Agreement.
Select Install Printers/MFPs.
Select Next.
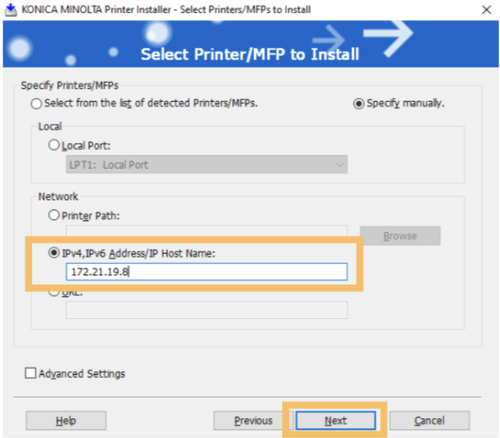
6. In the next window, select Specify Manually.
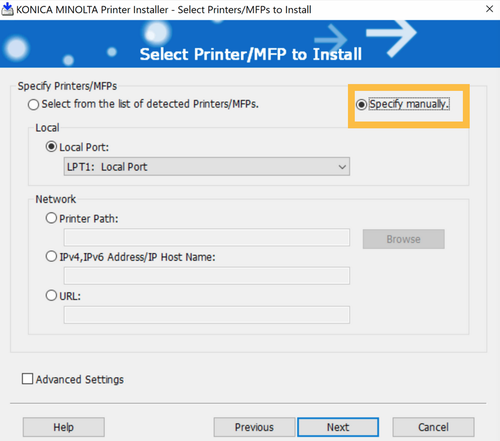
7. Select the box titled IPv4, IPv6 Address/IP Host Name.
Enter the IP Address for the printer you wish to setup. (See table below.)
Select Next.
| Device Location | IP Address |
|---|---|
| 1st Floor A | 172.21.16.7 |
| 2nd Floor A | 172.21.17.8 |
| 2nd Floor D | 172.21.21.8 |
| 3rd Floor A | 172.21.18.8 |
| 3rd Floor D | 172.21.22.8 |
| 4th Floor B | 172.21.19.8 |
(For this example, the 4th Floor B printer is being set up.)
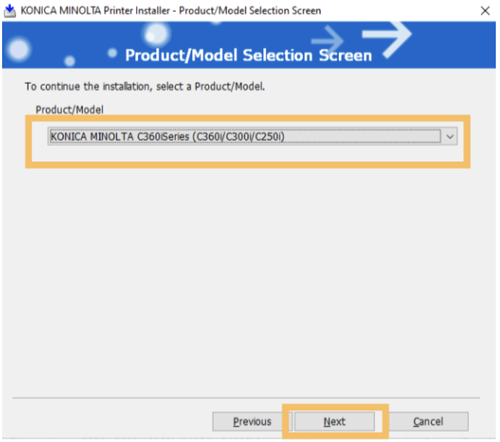
8. In the next window, it will ask you to select a Product/Model
Click on KONICA MINOLA C360iSeries (C360i, C300i, C250i)
Then, click Next.
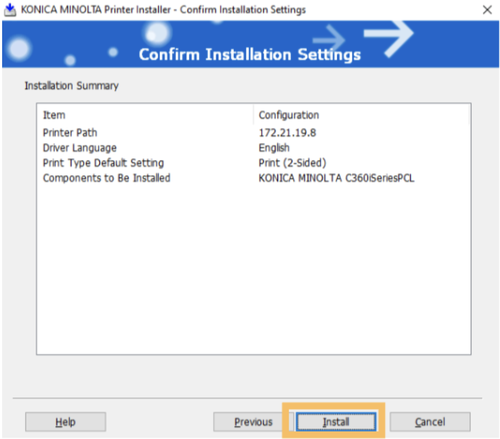
9. The next window will give you details about the printer you are installing.
Select Install.
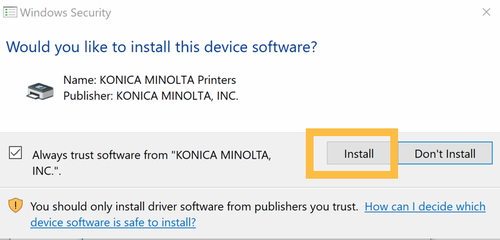
10. Windows Security will then verify that you want to install the device software.
Select Install.
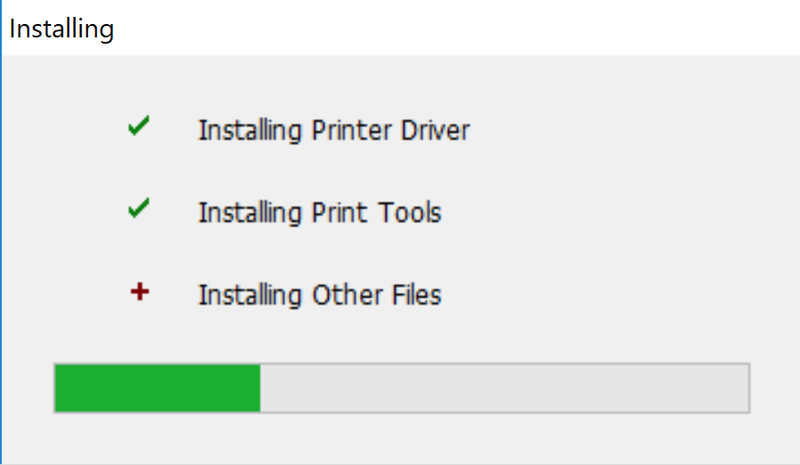
11. You will then see a window like this that displays the progress of the installation.
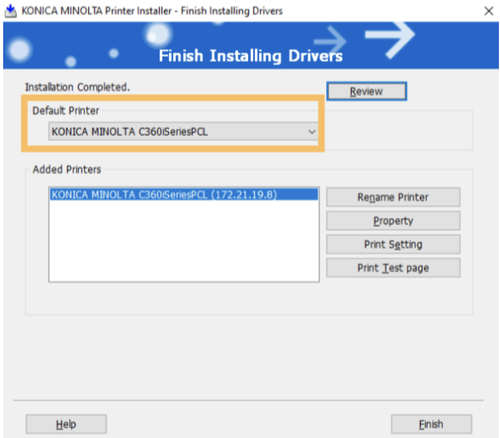
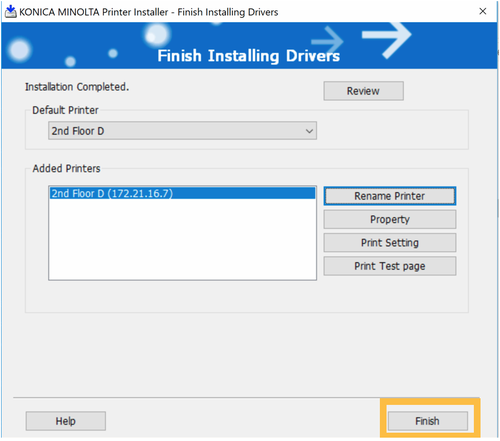
12. At the Finish Screen, be sure to select the correct printer.
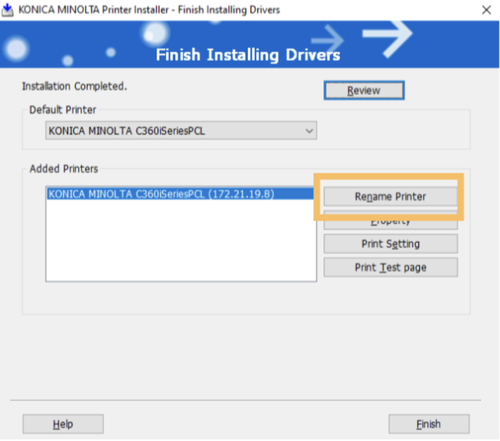
13. At the Finish Screen, you have the option to rename the printer It would be helpful to give it a descriptive name as shown below.
Select Rename Printer.
14. Rename your printer then select OK.
Please see the example below.

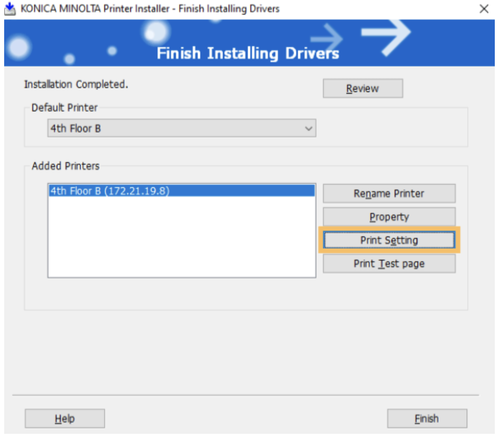
15. NOTE: All of these devices require an Account Code to print.
To use the account code, you need to add this setting to your printer preferences. Select Print Settings.
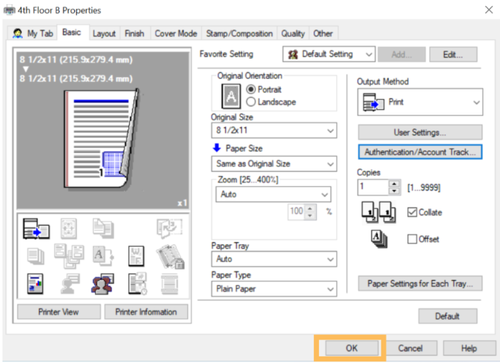
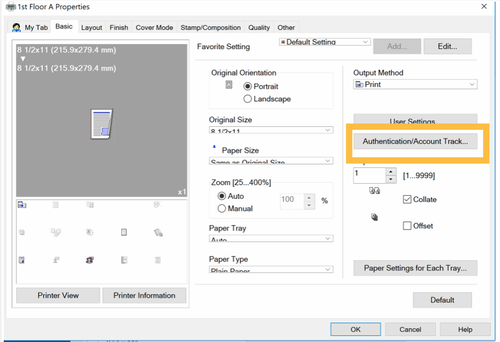
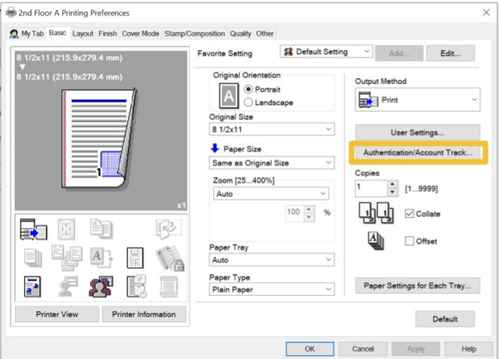
16. In the preferences window, choose the tab named Basic.
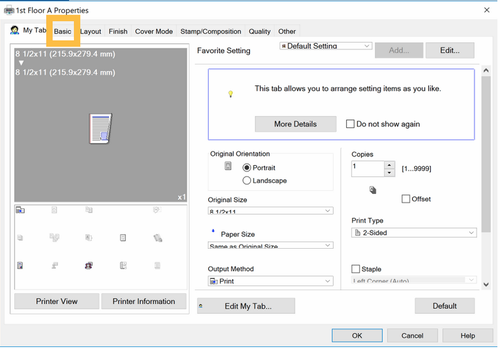
17. Now that you have the Basic tab open, select Account Track.

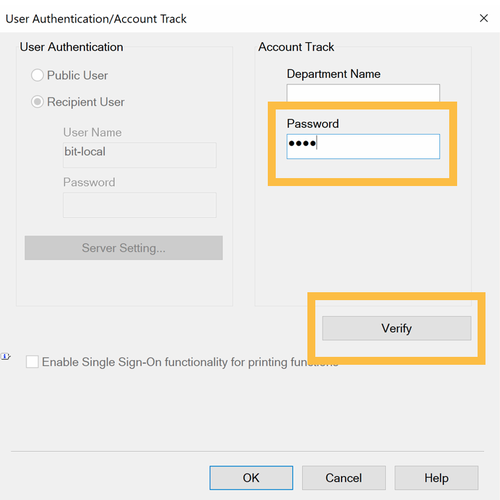
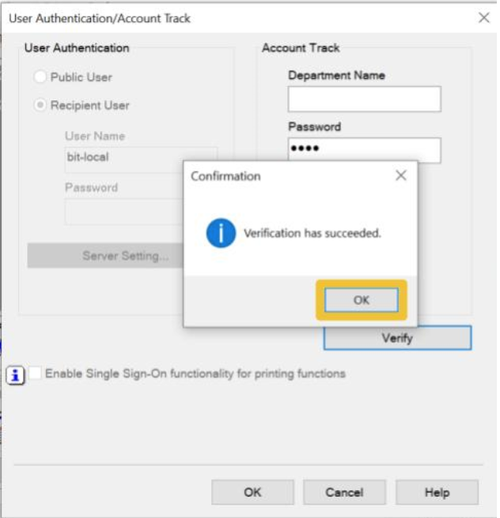
18. In the Account Track window, enter your assigned four digit copy/print code.
Enter the code in the Password field.
Select Verify.
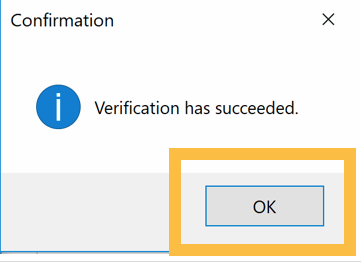
19. If successful, you will see a window like the one below.
Select OK.
20. Select OK.
21. Select OK.
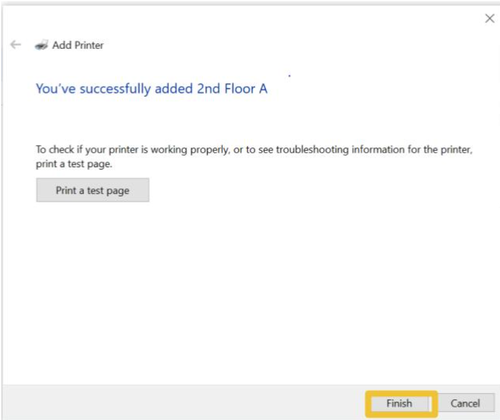
22. Now that you have renamed your printer and setup your Account Track, you are finished setting up.
Select Finish.
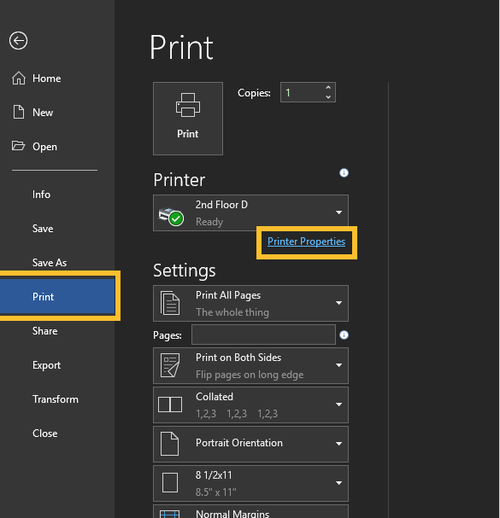
23. VERIFY that you are able to print by opening a document in Microsoft Word and attempting to print it.
From this window, make sure that you have the new printer selected and click on Printer Properties. This will open the same settings menu that you saw during the installation and setup process.
24. Go through the same steps again to ensure that your copy/print code was saved.
Select the tab named Basic.
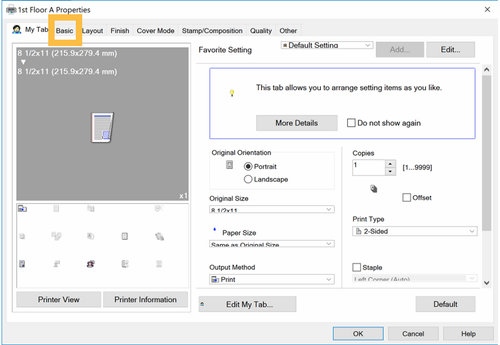
25. Next, select Account Track.
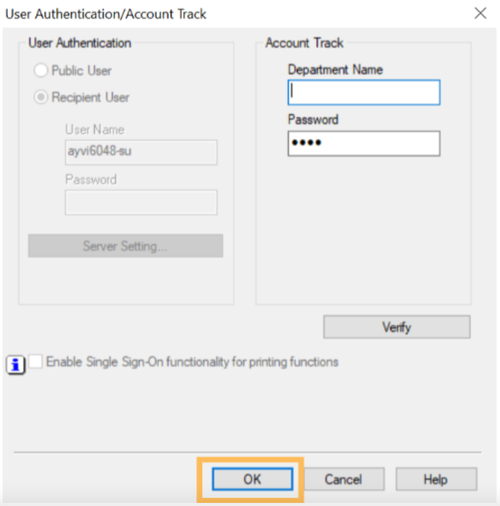
26. When the new window appears, there should already be four dots in the Password field, indicating that your Account Track was saved. If not, the please return to Step 16 of this guide to help you save your copy code from this window.
27. You are now able to print!
If you are unable to print successfully, please submit a ticket to BIT (bit-help@colorado.edu) for assistance.
Printer Installation & Setup - Mac
NOTE: Before beginning, please be sure that you are connected to UCB Wireless OR connected to the network via Ethernet.
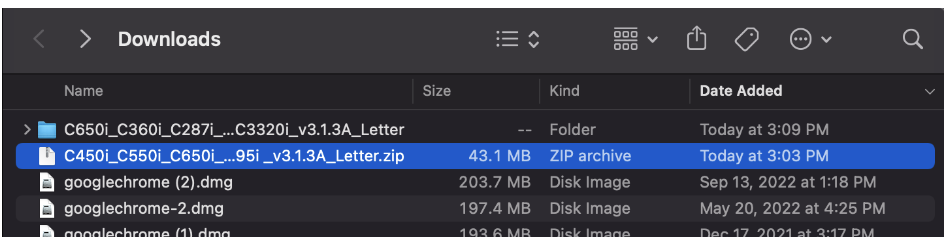
Download the printer driver for the version of OSX you are running here:
If you need to check the OS version for your computer click on the Apple Icon in the menu bar and choose About This Mac.
- In a Finder window under Downloads, you will find the driver and double-click on it.
2. Click on the package once it has unzipped.

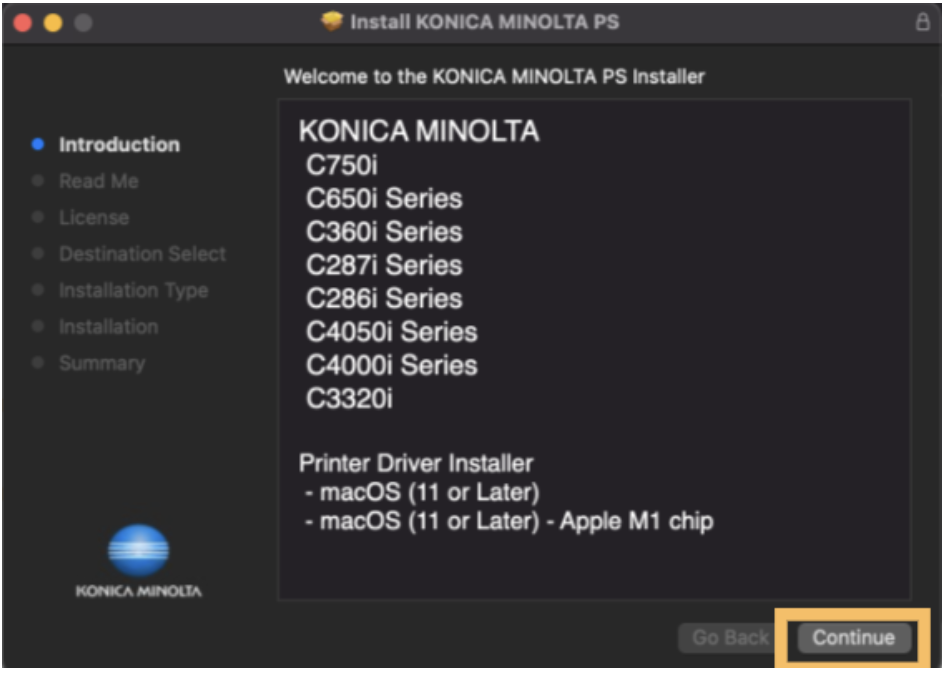
3. Click Continue on the Introduction window.
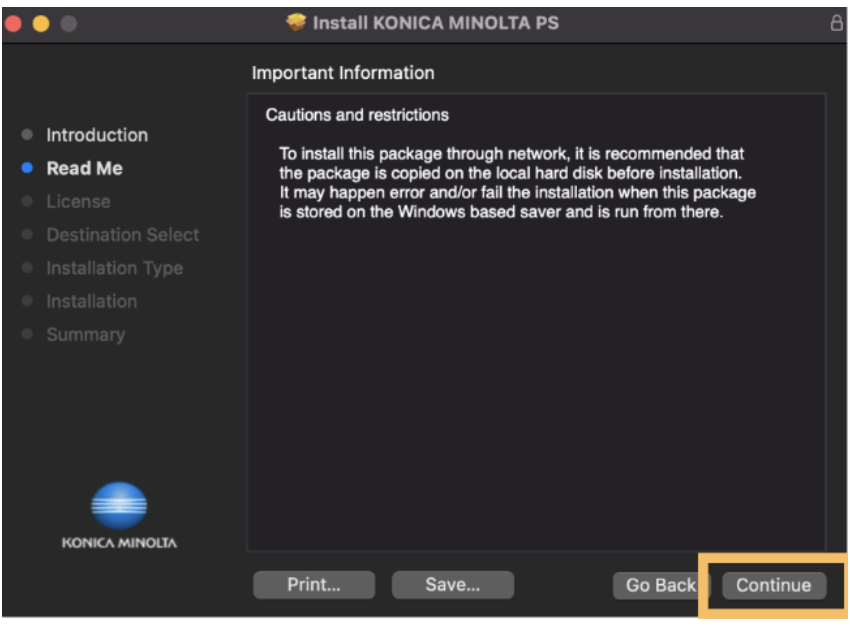
4. When you click on Continue on the Read Me screen, a window will pop up, click OK.

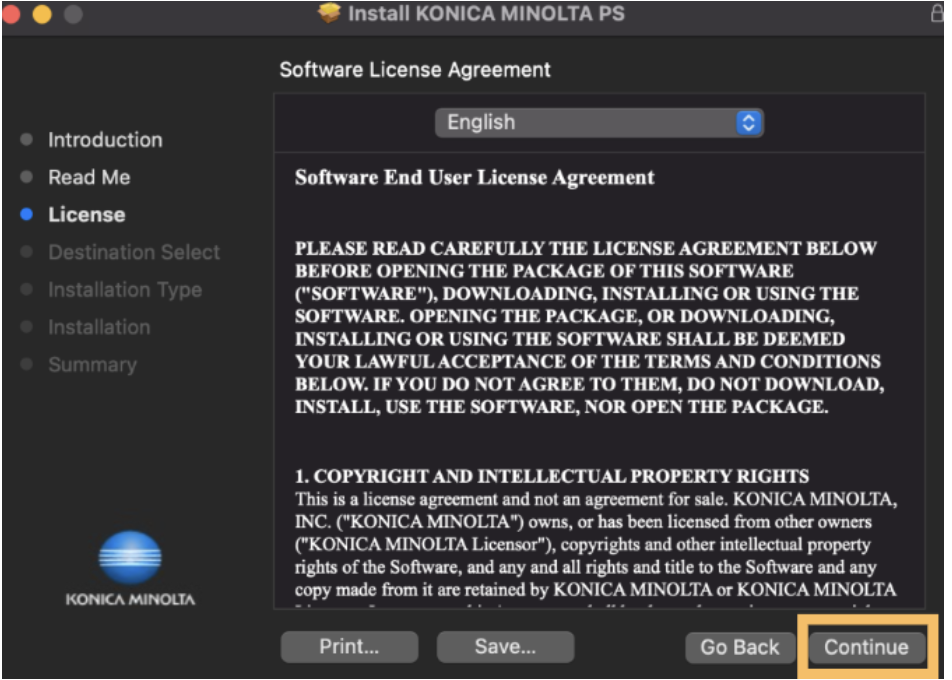
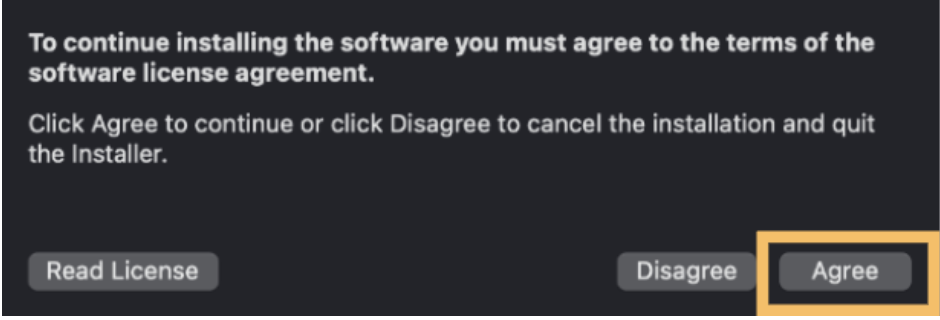
5. Click Continue on the License screen. It will then prompt you to agree to the terms of the software license agreement. Click Agree.
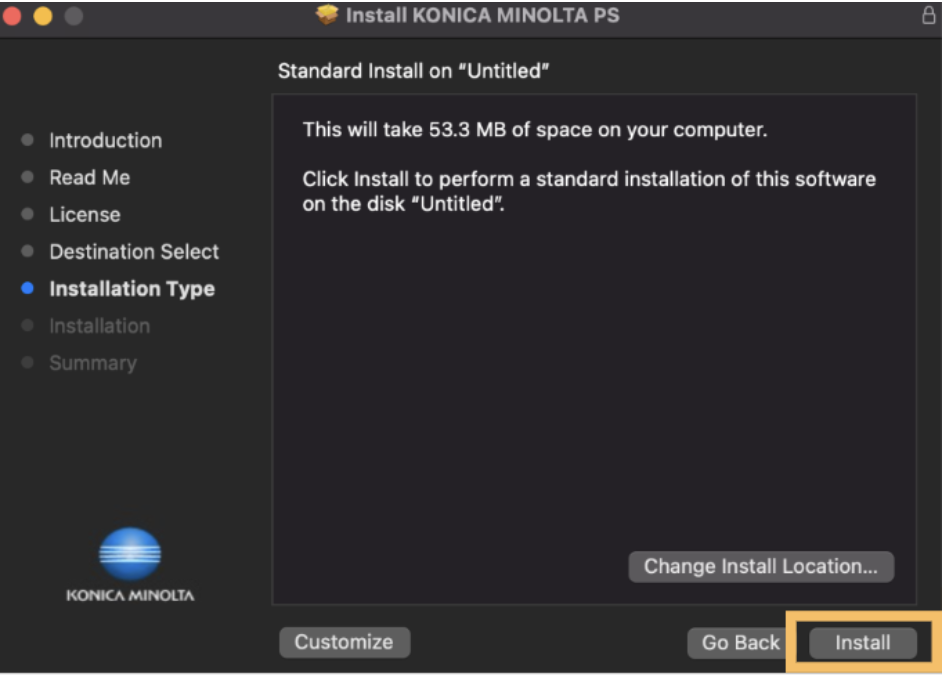
6. Select Install on the Installation page.
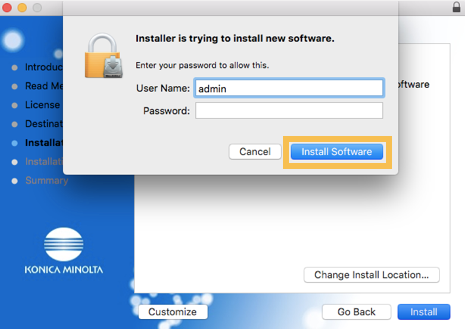
7. You will then be prompted for Admin credentials. After entering the appropriate credentials, select Install Software.
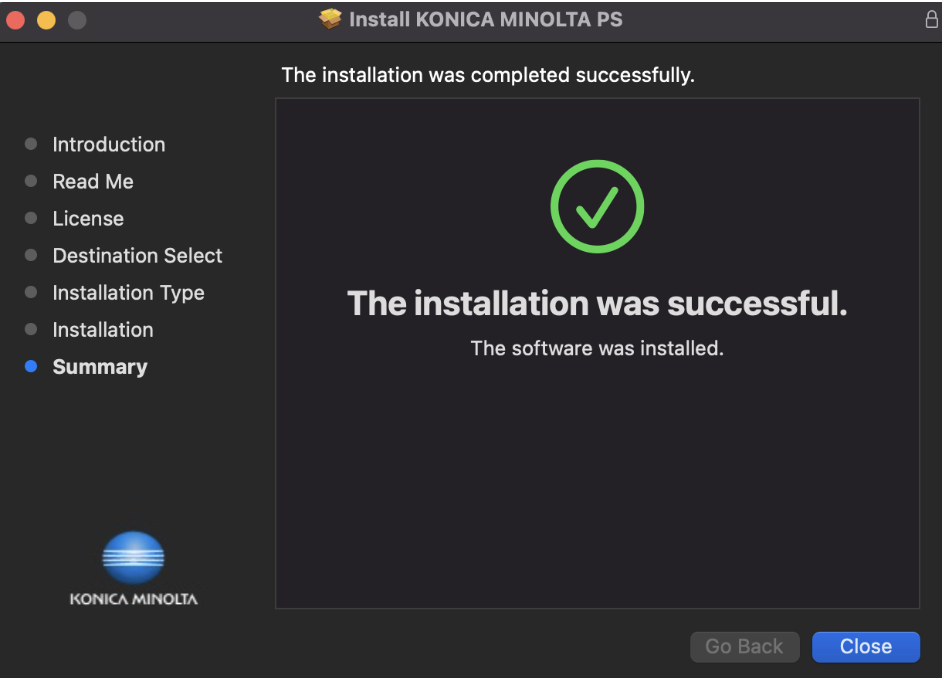
8. Afterwards, installation will begin. Once it is complete, you will screen like the one below. Then, select Close.
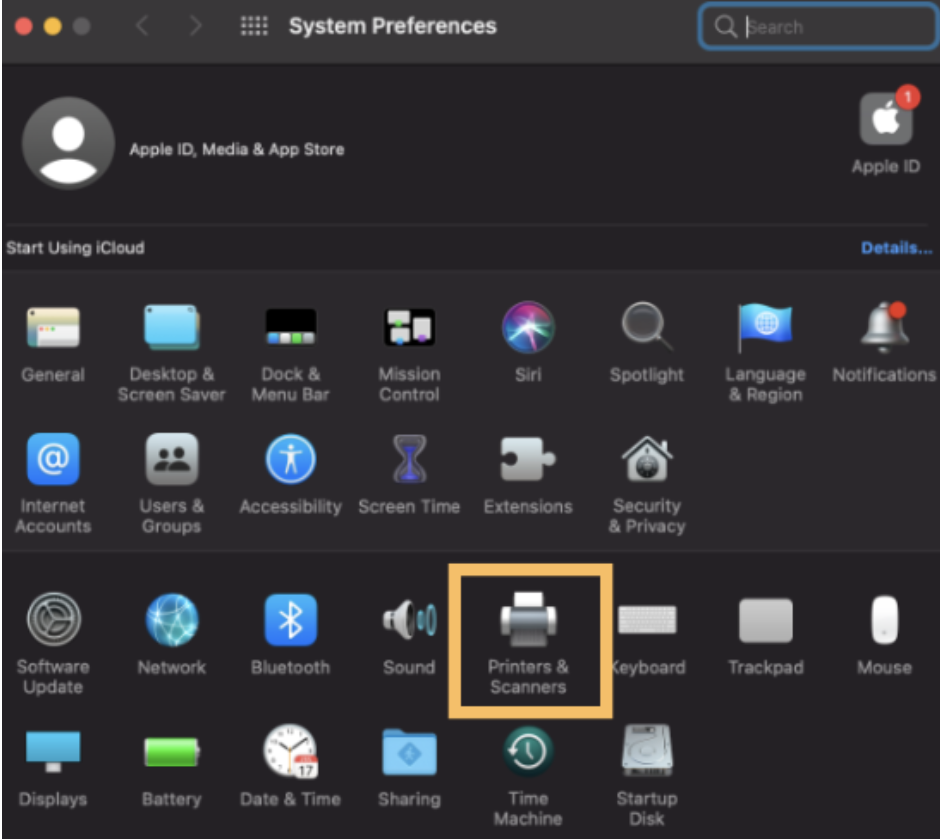
9. To add the printer to your system open System Preferences and select Printers & Scanners.
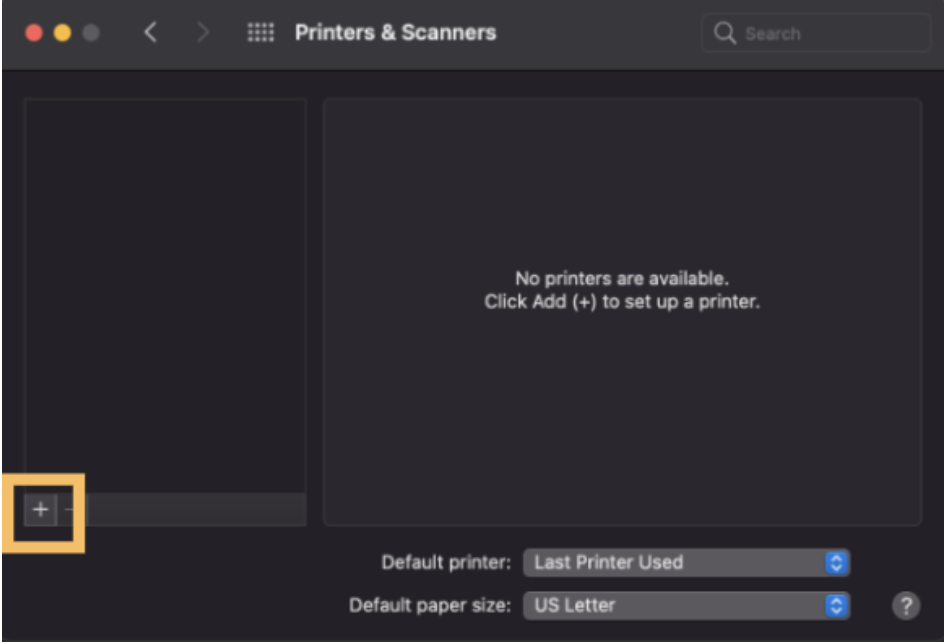
10. If the lock in the bottom left corner of this window is closed, click it to be asked to authenticate using Administrator credentials. Then, select the '+' in the bottom left of the screen.
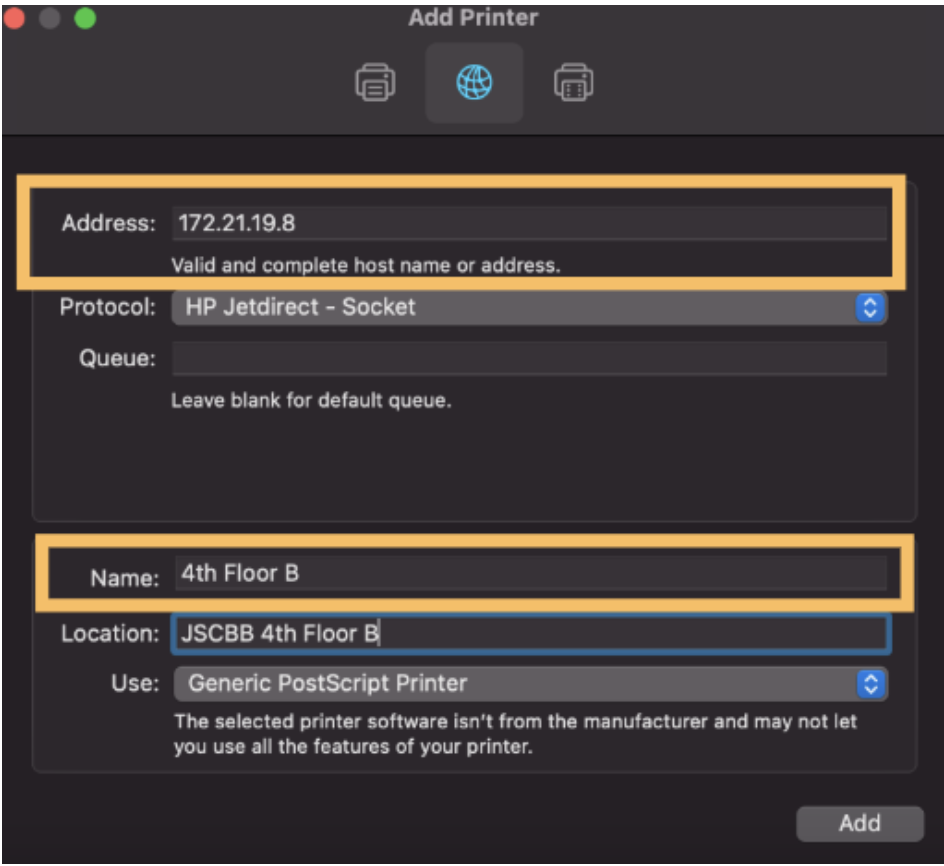
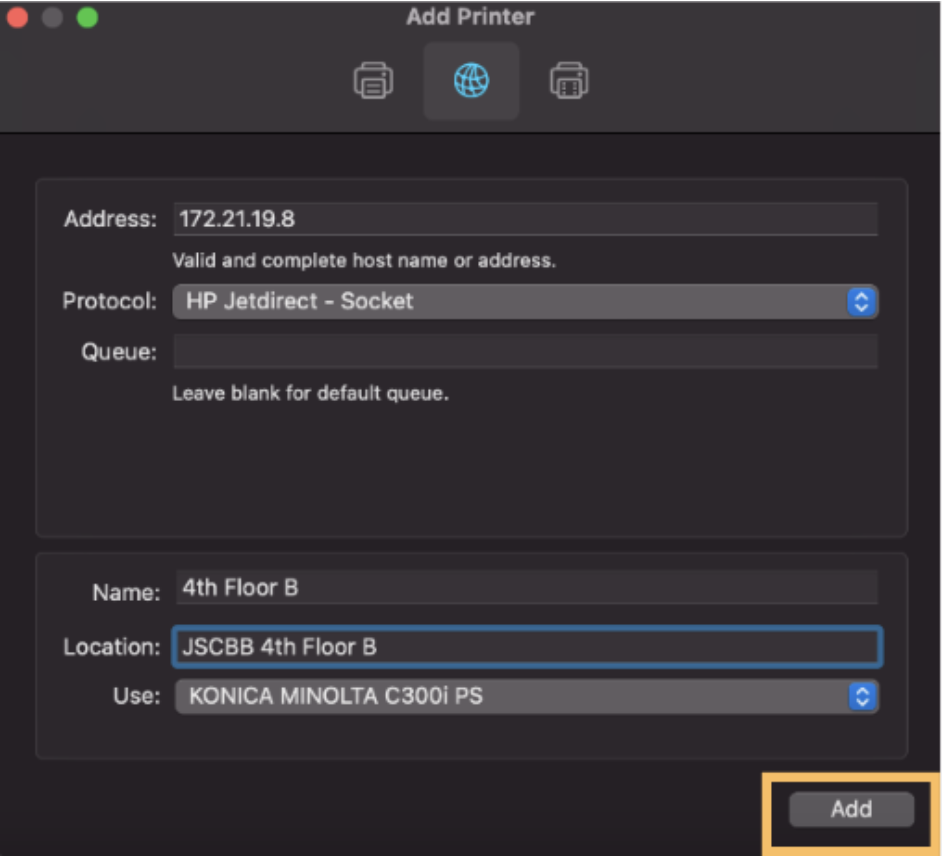
11. This will open a new window. Be sure to select the IP tab.
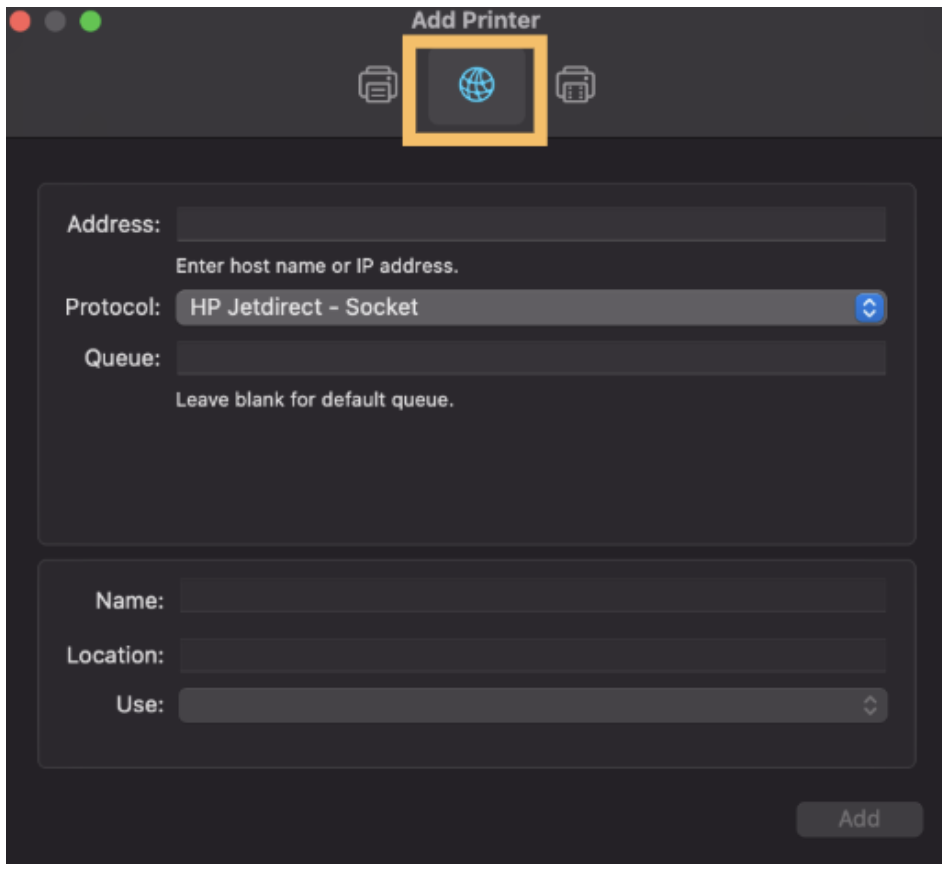
12. In this tab, select the HP Jetdirect - Socket option next to Protocol.
13. Input the IP Address of the device that you would like to use in the Address field and add a name for that device in the Name field.
Using the standard from the table below will help identify which device you are using.
| Device Location | IP Address |
|---|---|
| 1st Floor A | 172.21.16.7 |
| 2nd Floor A | 172.21.17.8 |
| 2nd Floor D | 172.21.21.8 |
| 3rd Floor A | 172.21.18.8 |
| 3rd Floor D | 172.21.22.8 |
| 4th Floor B | 172.21.19.8 |
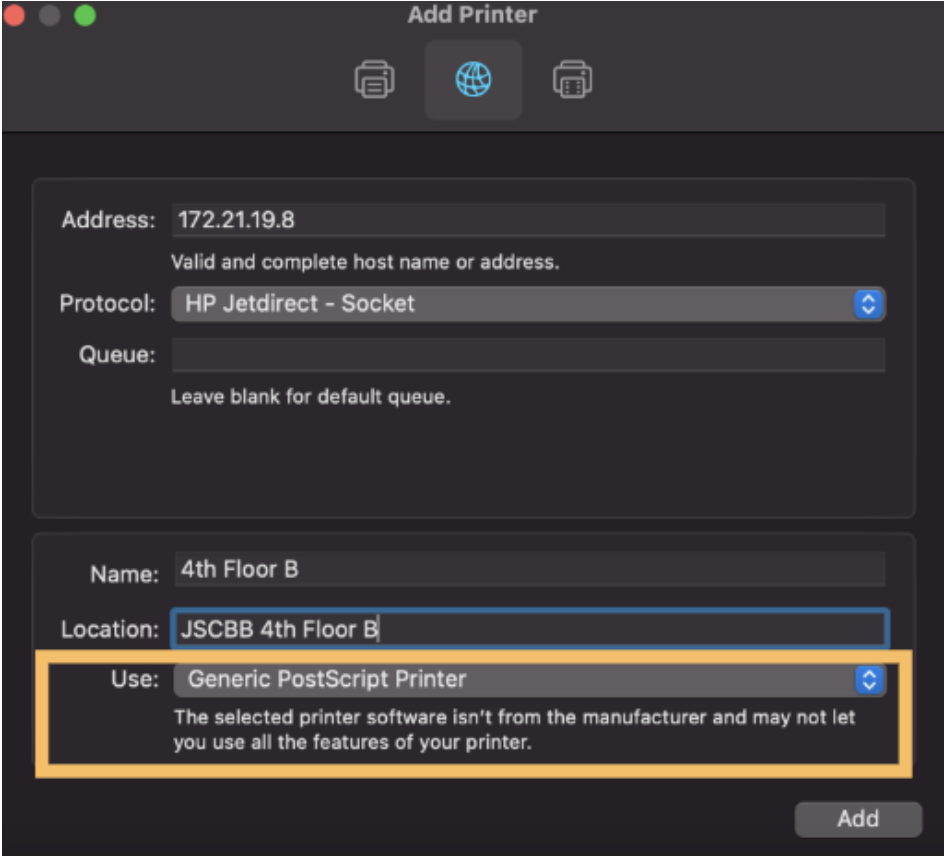
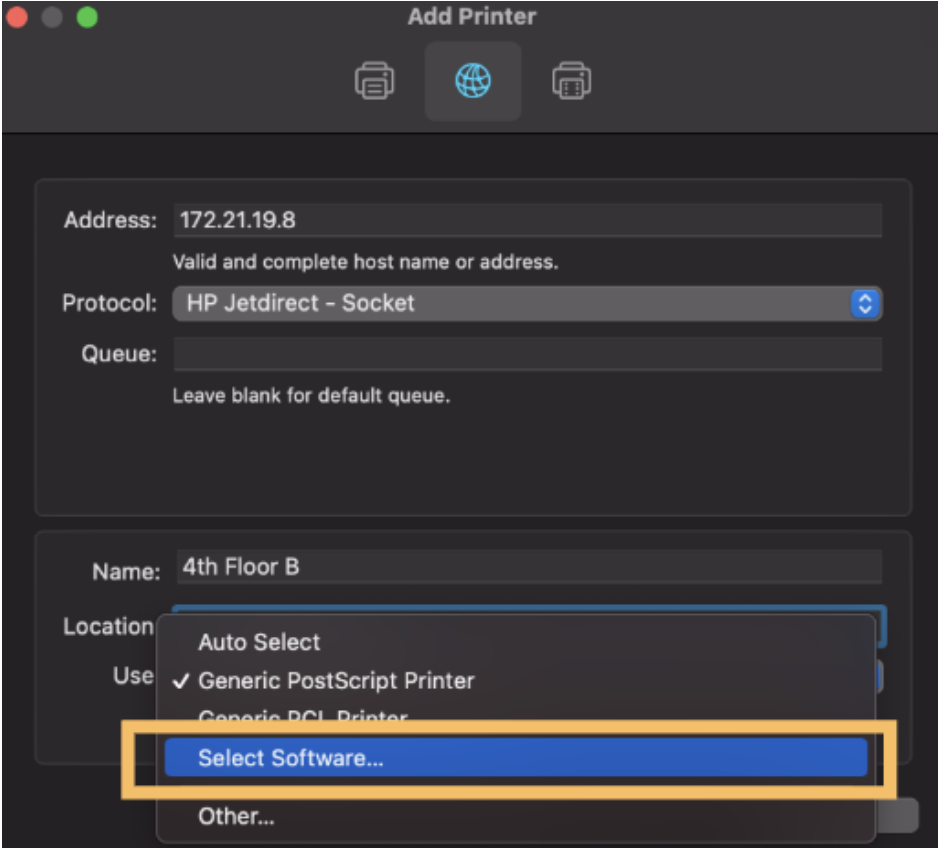
14. In the Use field, select the pull down menu and select Select Printer Software.
This will then open a window labeled Printer Software.
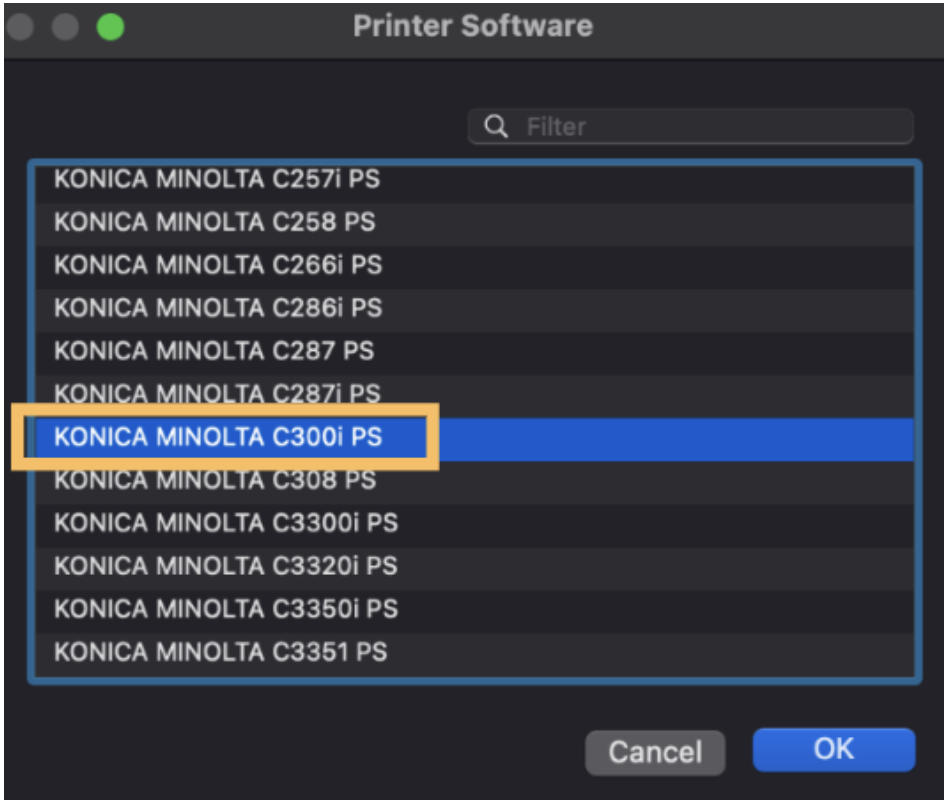
NOTE: The 1st Floor A Wing printer should use Konica Minolta C360i.
All other devices in the list above are Konica Minolta C300i.
Choose the appropriate model and click OK.
15. The printer window should now look something like this:
Select Add.
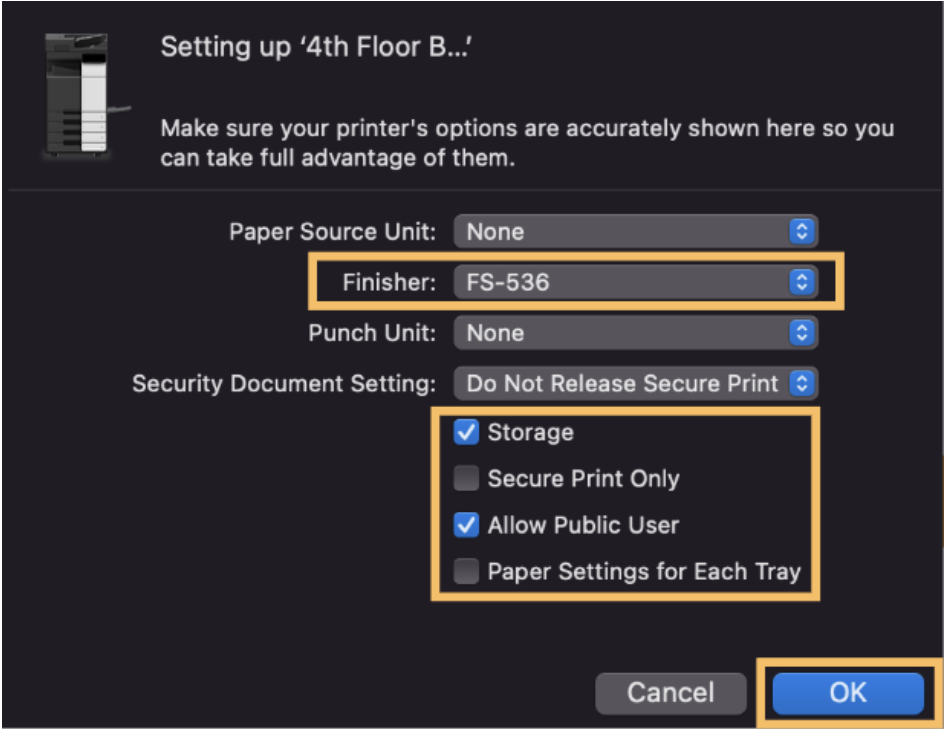
16. In the final configuration details section the Finisher needs to be chosen as FS-536.
NOTE: Do NOT Choose "SECURE PRINT ONLY".
Click OK.
17. The device should appear in your printer window as seen below:
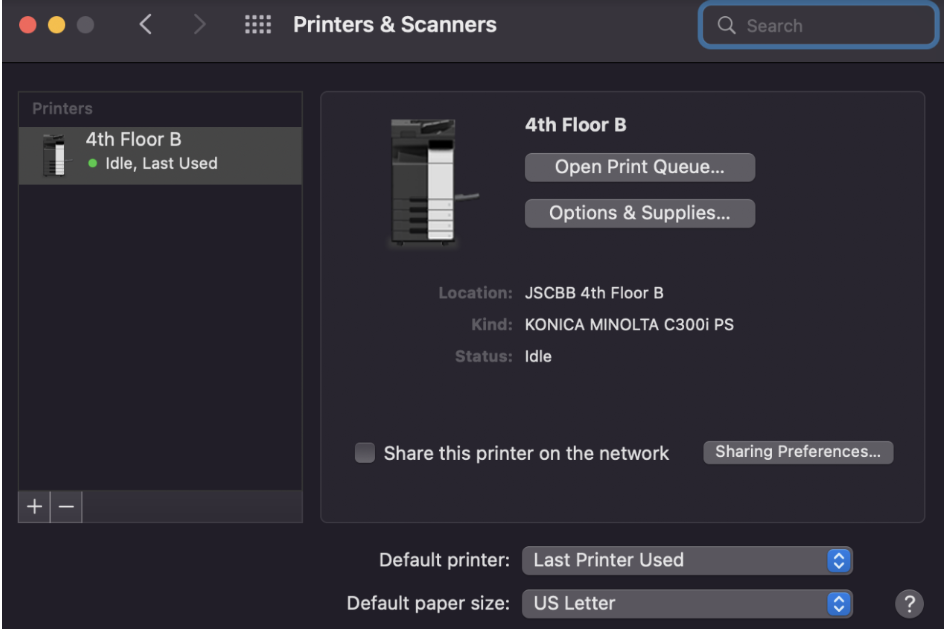
All printers in the building use Account Tracking to control the printing output based on configuration. This is in the form of a four digit code that will be assigned to a speed type.
These codes can be obtained by contacting your Lab PI or someone in your department.
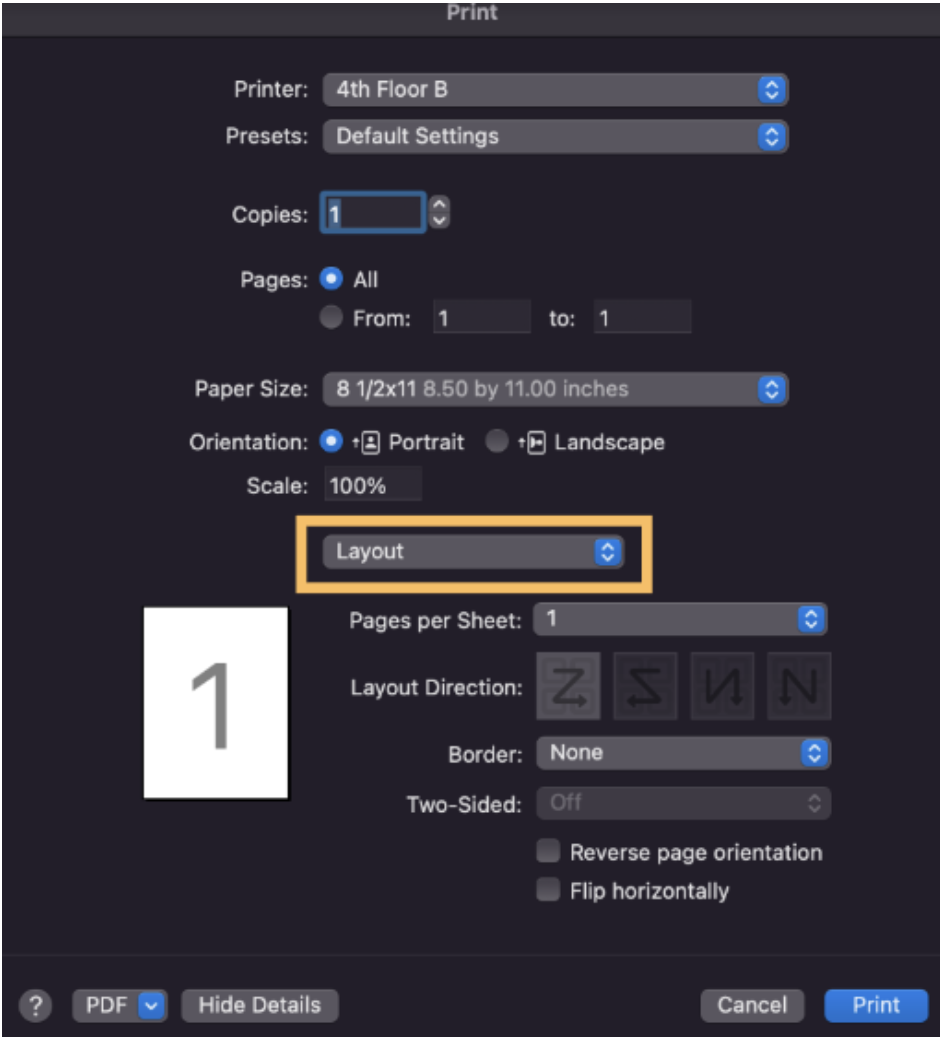
18. To configure the printer to print using your code you need to add a preset as seen below:
From a Microsoft Word print window, choose the Output Method from the settings pulldown list.
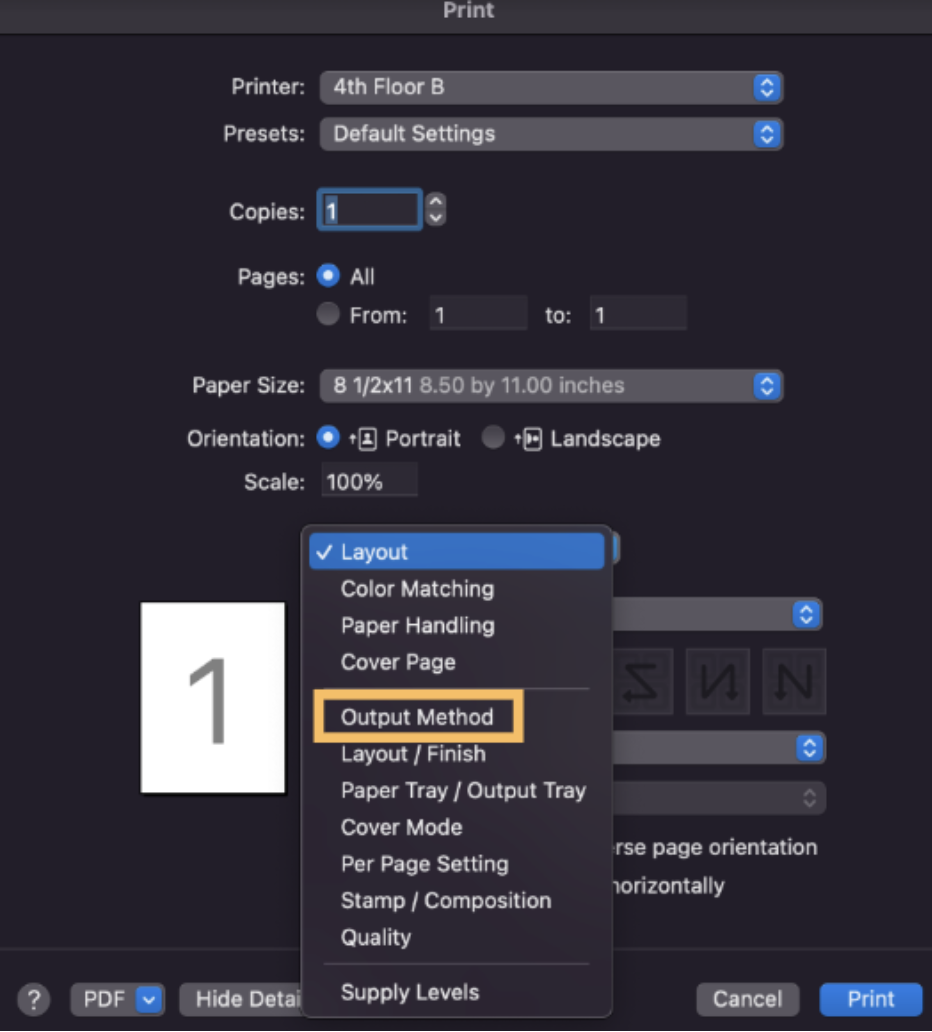
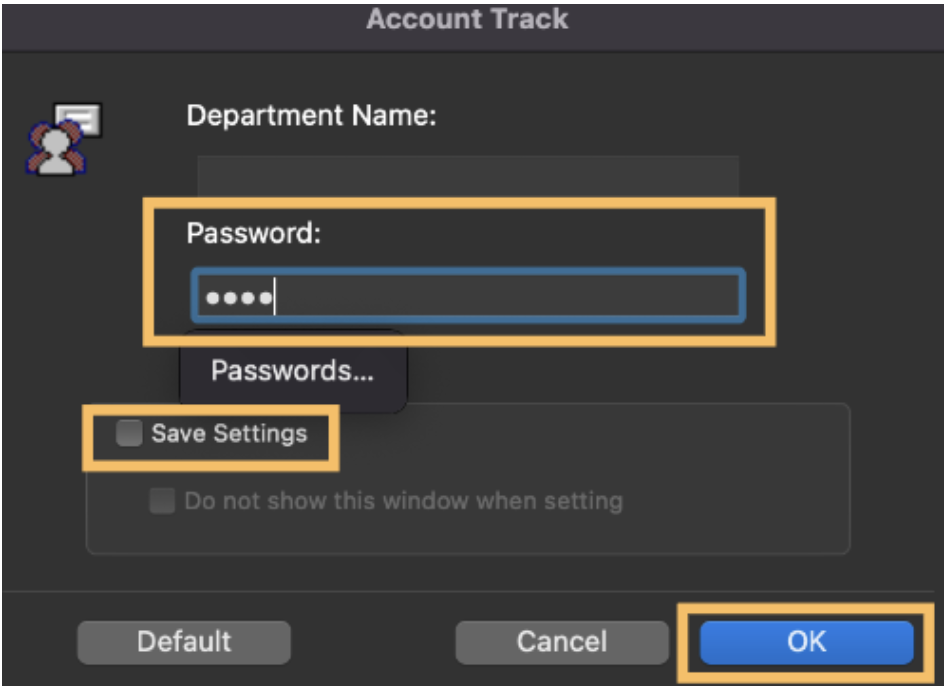
19. In this window check the Account Track box.

20. Then enter your 4-digit copy/print code in the Password blank.
Select Save Settings, then select OK.
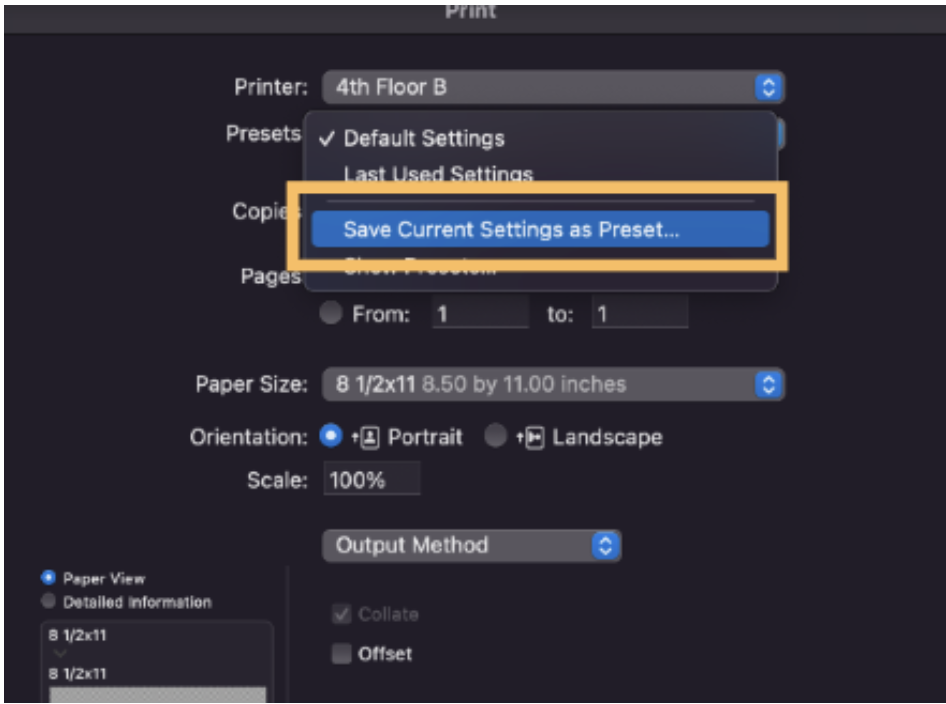
21. Back at the main print window, save these settings as a Preset. In the drop down menu next to Presets, select Save Current Settings as Preset.
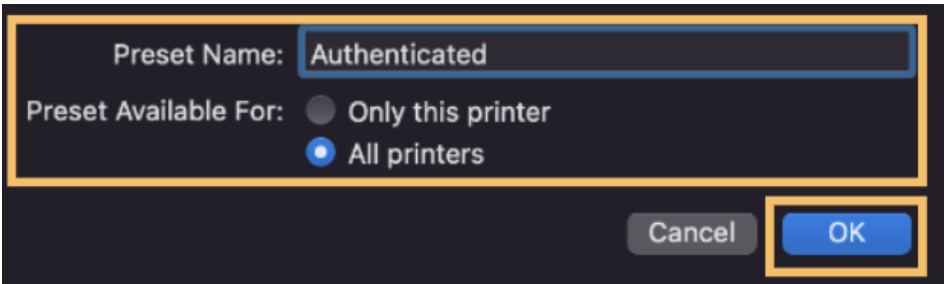
22. It's helpful to be descriptive in this instance, as seen below.
Select the preset to be available for All Printers in case you choose to add more building printers in the future.
Select OK, then print to verify that your settings are working properly.
NOTE: You may need to select the preset you created when printing from different applications.
Adding Additional Building Printers - Windows
These instructions will show you how to add additional Building Printers after you've followed the instructions above to install the print driver and setup the first printer you need.
- Navigate to Printers & Scanners.
Click on Add a printer or scanner.
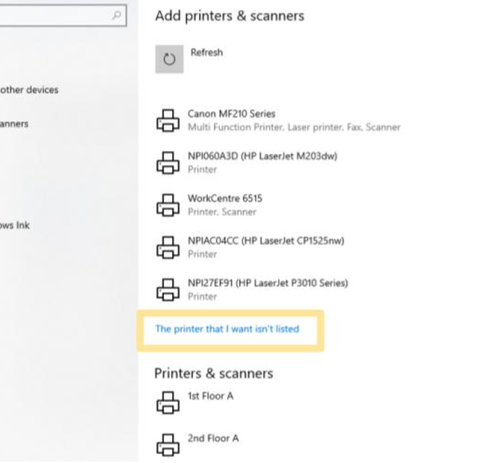
2. Click The printer that I want isn’t listed.
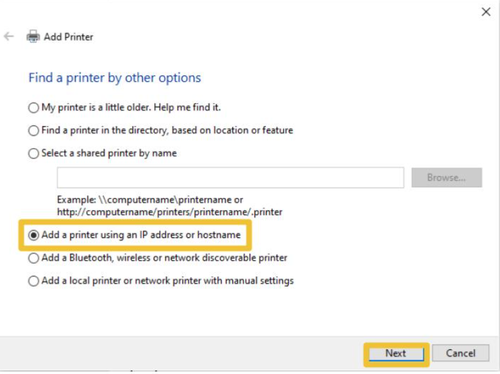
3. Select Add a printer using an IP address or host name.
Then Click Next.
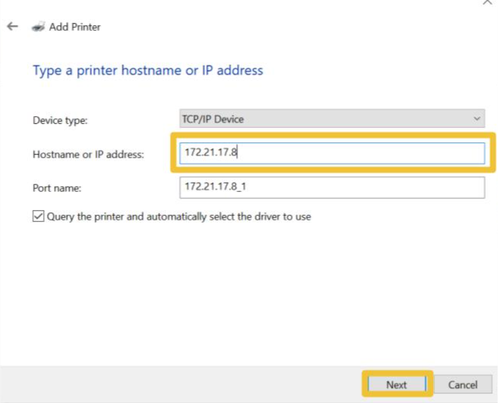
4. Next to Device Type: select TCP/IP Device.
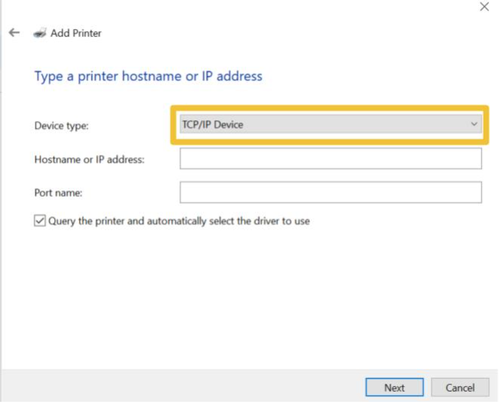
| Device Location | IP Address |
|---|---|
| 1st Floor A | 172.21.16.7 |
| 2nd Floor A | 172.21.17.8 |
| 2nd Floor D | 172.21.21.8 |
| 3rd Floor A | 172.21.18.8 |
| 3rd Floor D | 172.21.22.8 |
| 4th Floor B | 172.21.19.8 |
(For this example, the 2nd Floor A printer is being set up.
5. Enter the IP Address for the printer you wish to set up. (See table.)
Select Next.
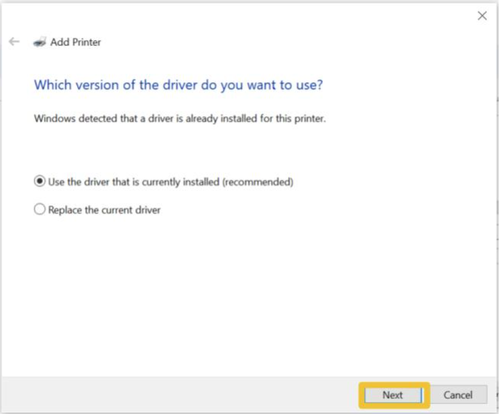
6. In the next window it will ask which version of the driver you want to use and automatically have the recommended option selected.
Click Next.
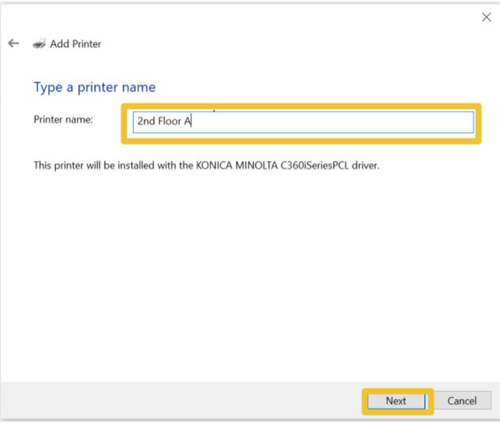
7. The next window will prompt you to type a printer name.
Change it to the name that corresponds to the IP Address you used.
Click Next.
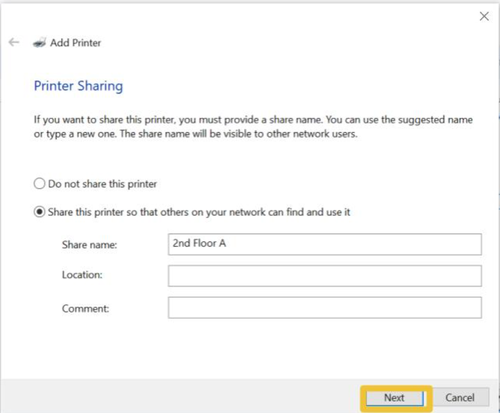
8. The next window will ask if you want to share the printer to your network.
Click Next.
9. Click Finish.
Now this printer should be added into your printers and you are ready to print!
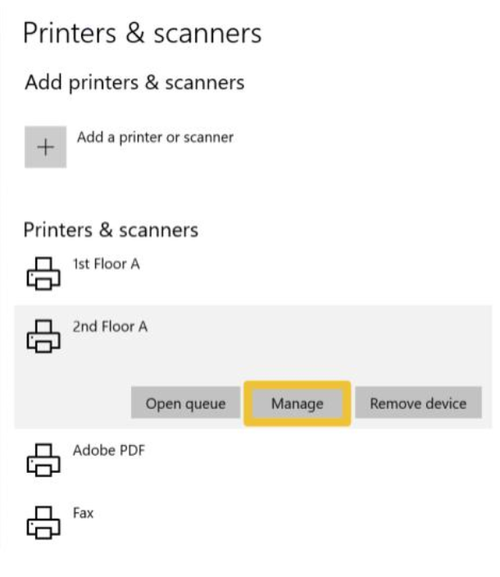
10. NOTE: All of these printers require an Account Code to print.
To use the account code, you need to add this setting to your printer preferences.
Click on the newly added printer and click Manage.
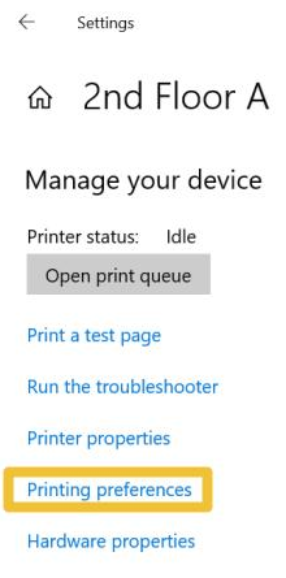
11. Click on Printing Preferences.
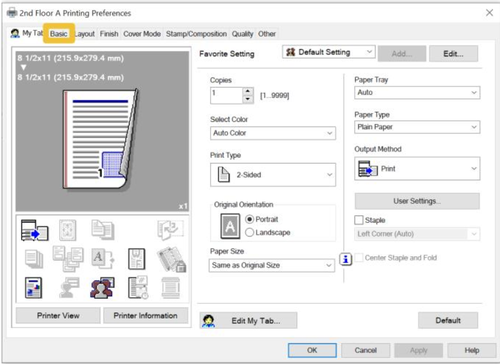
12. The Printing Preferences window will pop up, and then you will want to navigate to the Basic section, Click Basic.
13. Click Authentication/Account Track..
14. In the Account Track window, enter your assigned four digit copy/print code.
Enter the code in the Password field.
Select Verify.

15. Click OK.
You are ready to print!
Secure Print - Windows
IMPORTANT: You will need your print/copy code for this procedure. If you do not know your print/copy code, please contact your PI or Angela Janacek.
Once you have a file to print, go through these steps to secure print your document. This process is to ensure sensitive documents do not print until you complete the following steps.
NOTE: We are using Microsoft Word to serve as an example for this tutorial. You can utilize Secure Print from any application by accessing the Printer Properties from the print menu.
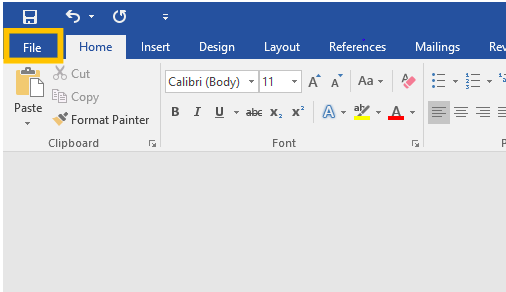
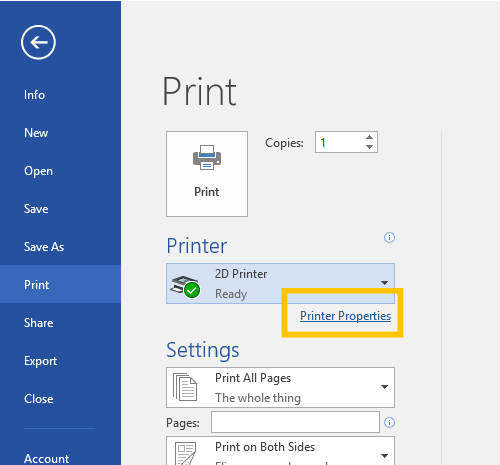
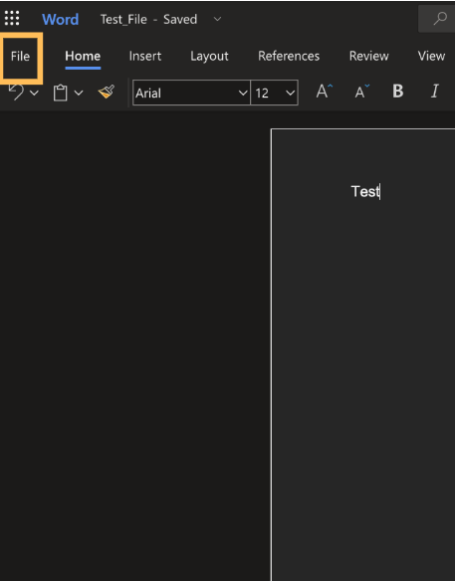
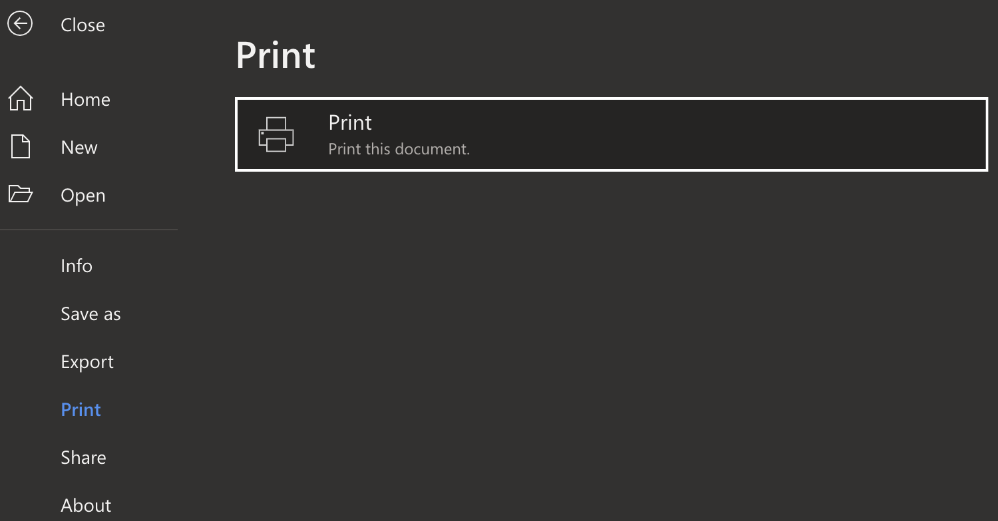
- Click File at the top of the your document page.
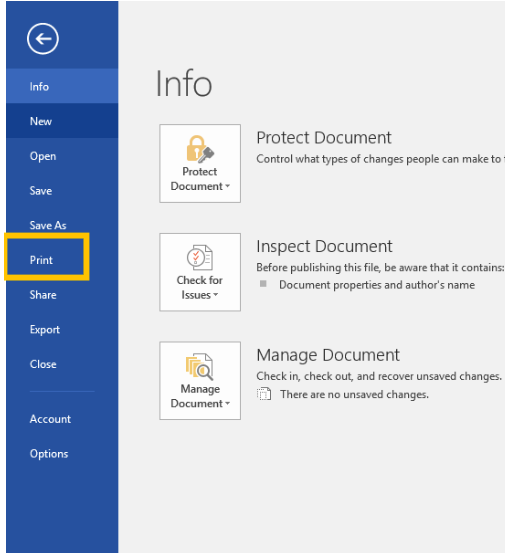
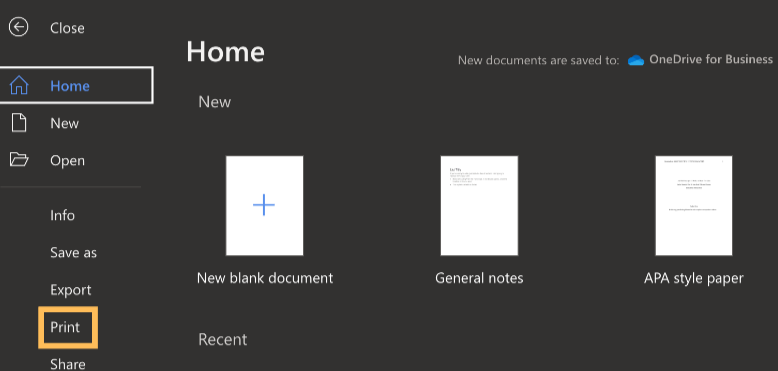
2. Select Print.
3. Make sure that the correct building printer is selected.
Select Printer Properties.
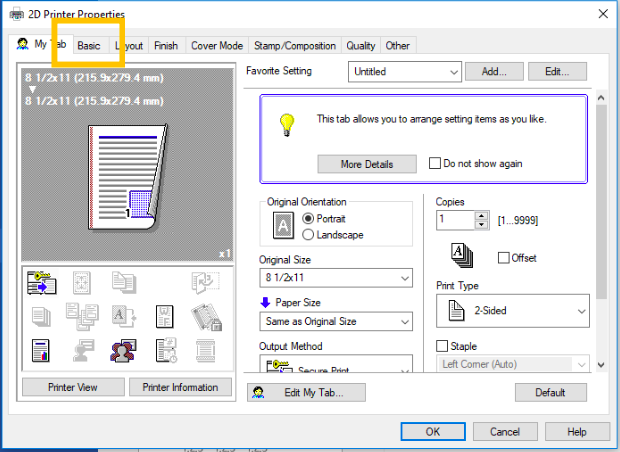
4. Select Basic.
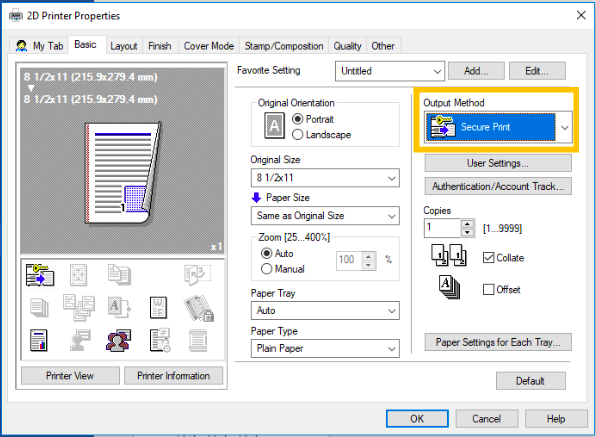
5. Select Secure Print from the dropdown menu.
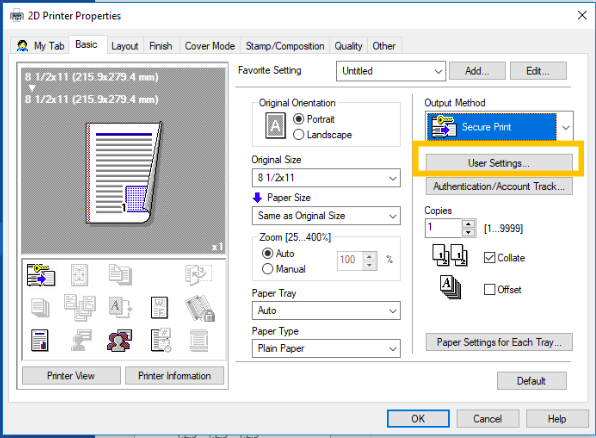
5. Select User Settings.
6. Choose a 5 digit code to use as the Document ID . It CANNOT be 12345.
The password must be 4 digits, and they can be whatever you like.
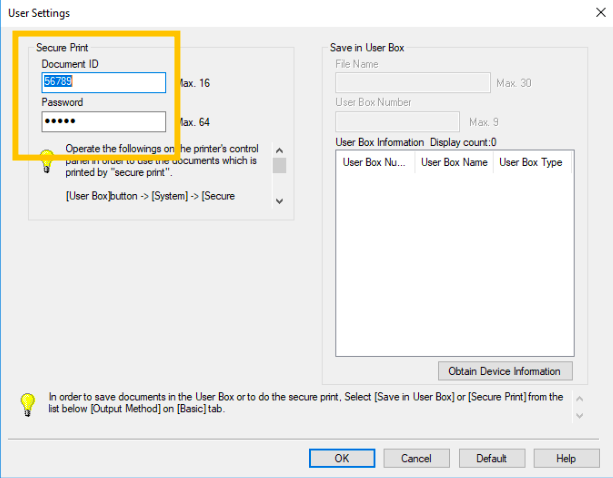
7. Select OK.
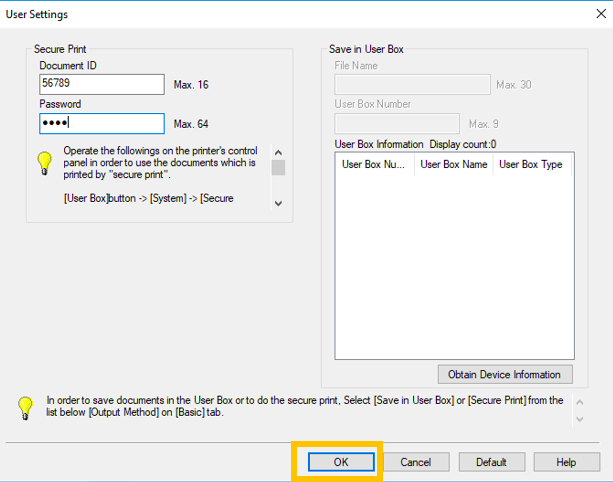
8. Select OK again.
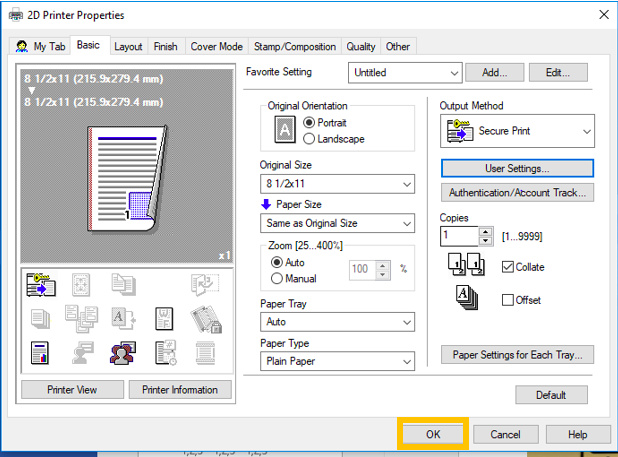
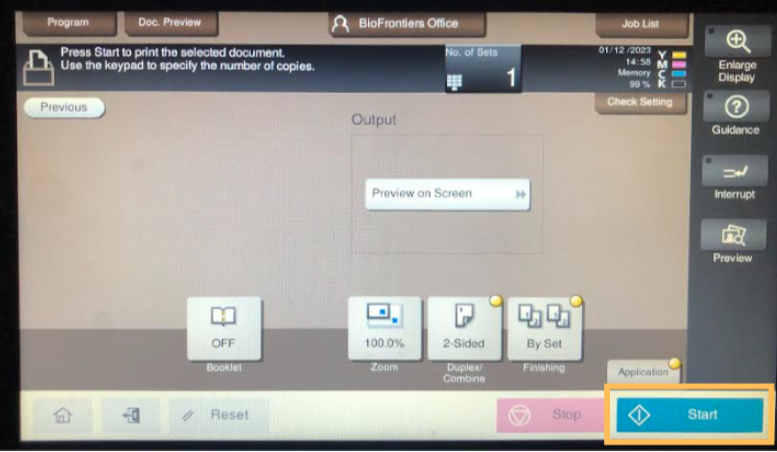
9. Once you are back on the Print options pictured below, ensure that the correct printer is still selected and Select the Print button above (with the icon of a printer) to print.
<INSERT PHOTO>
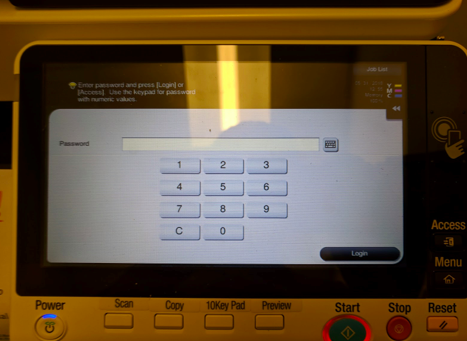
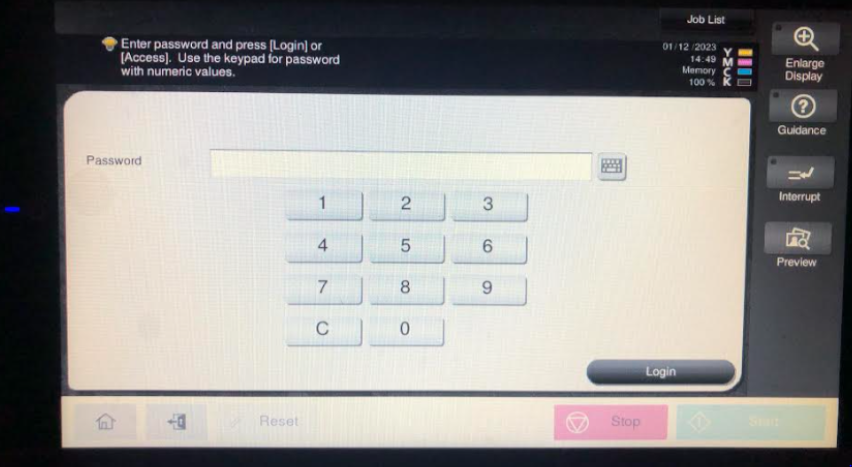
10. Now, head to the printer you were printing to.
Enter your print/copy code.
If you do not know what your print/copy code is, please contact your PI or Angela Janacek.
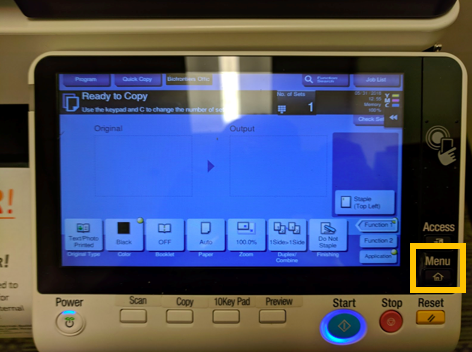
11. Hit the Menu button.

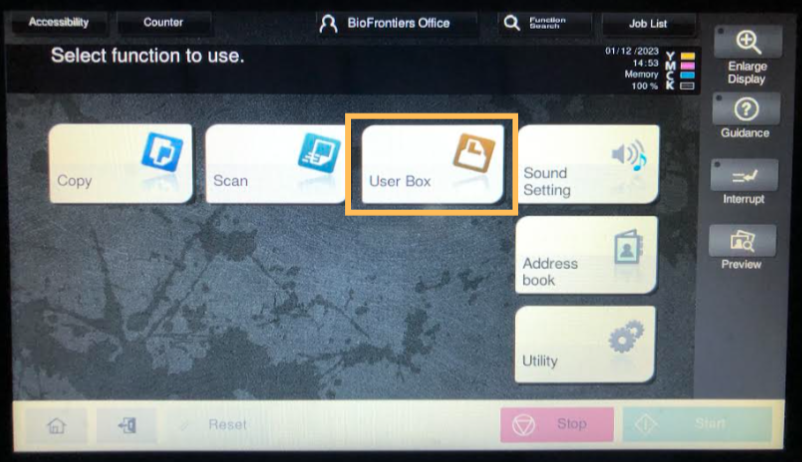
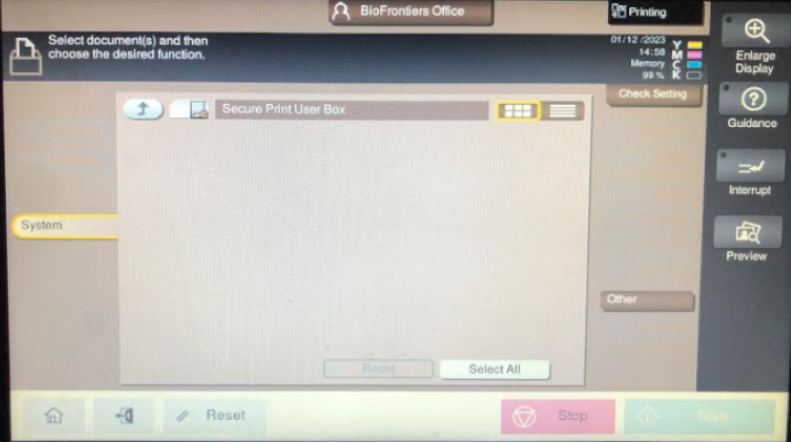
12. Select the option on the screen labeled User Box.
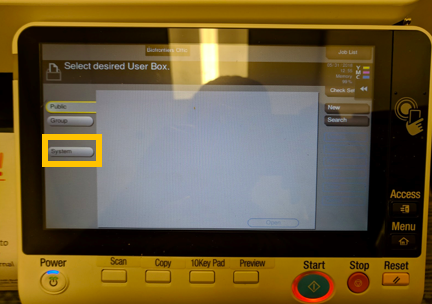
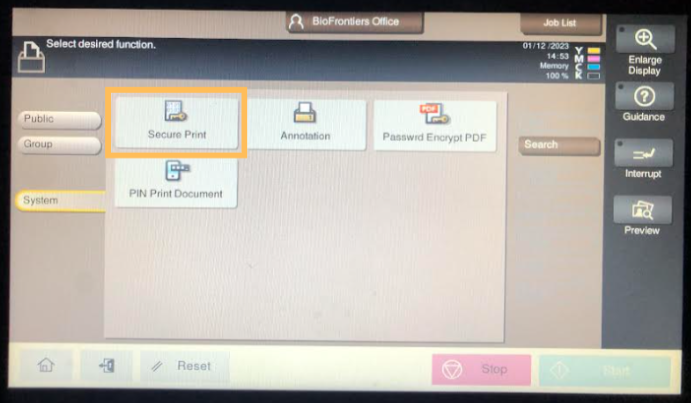
13. Select the option to the left of the screen labeled System
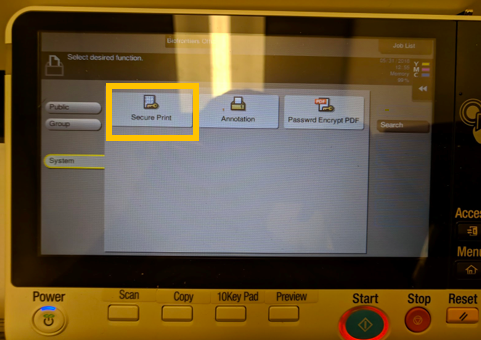
14. Select the Secure Print option.
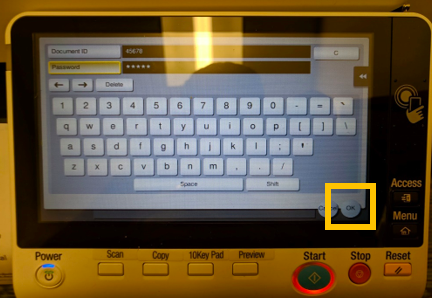
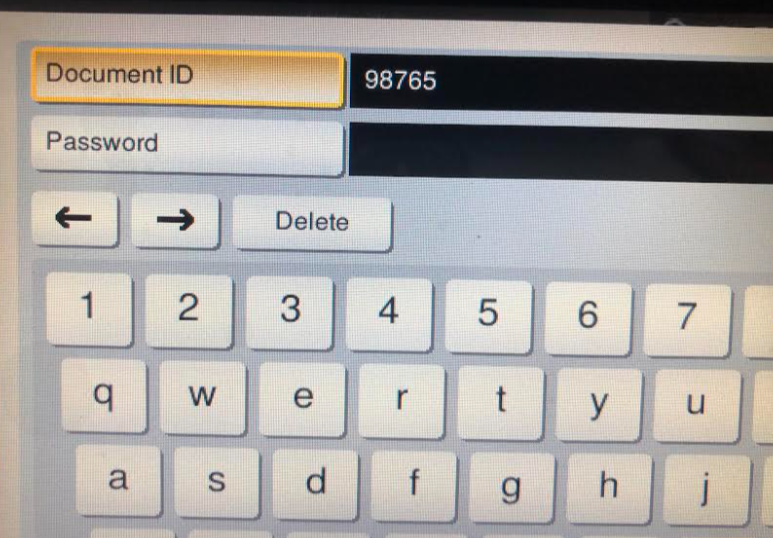
15. Enter the 5 digit Document ID that you created in Step 6 along with the 4 digit Password that you chose. Then select OK.
16. Select the document you would like to print and select Print.
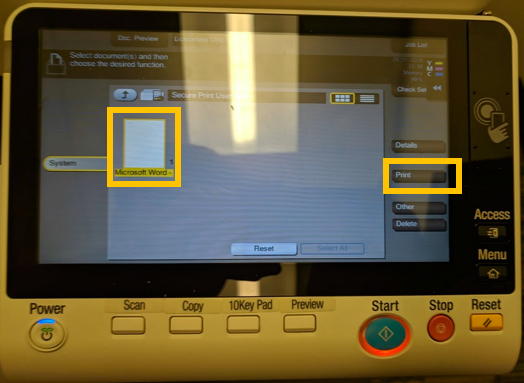
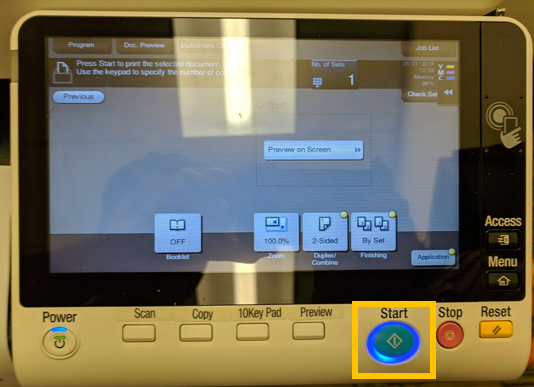
17. Hit the Start button and your document will now print.
Secure Print - Mac
IMPORTANT: You will need your print/copy code for this procedure. If you do not know your print/copy code, please contact your PI or Angela Janacek.
Once you have a file to print, go through these steps to secure print your document. This process is to ensure sensitive documents do not print until you complete the following steps.
NOTE: We are using Microsoft Word to serve as an example for this tutorial. You can utilize Secure Print from any application by selecting Output Method from the print menu.
- Click File at the top of the page. Select Print from the dropdown menu.
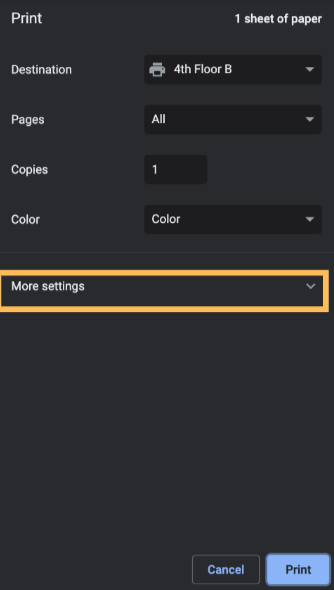
2. Then click Print.
3.From the pop-up window, select More Settings.
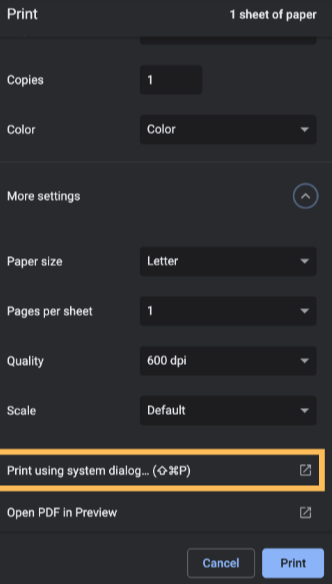
4. Scroll to the bottom of the pop-up window and select "Print using system dialog..."
5. Click on the box that says Layout and select the Output Method option.
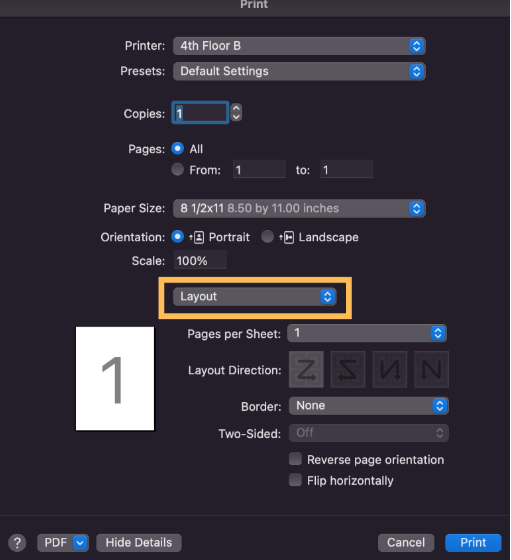
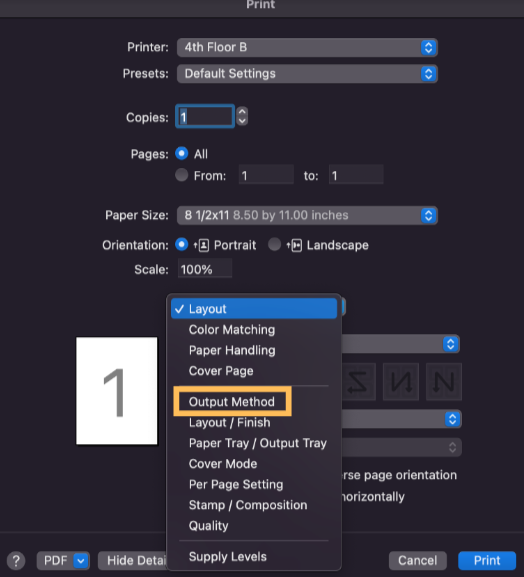
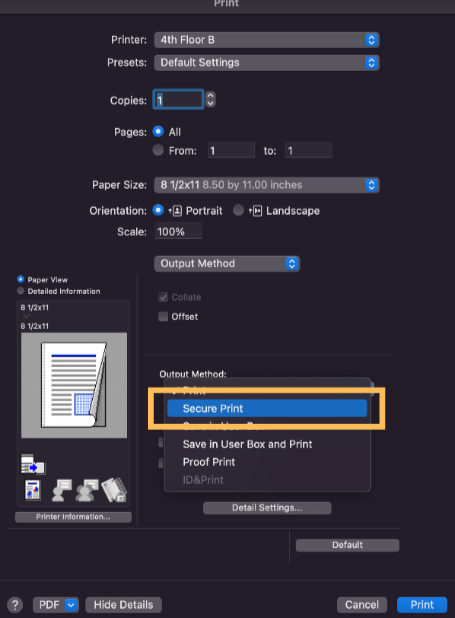
6. Near the bottom of the screen, select Secure Print from the Output Method menu.
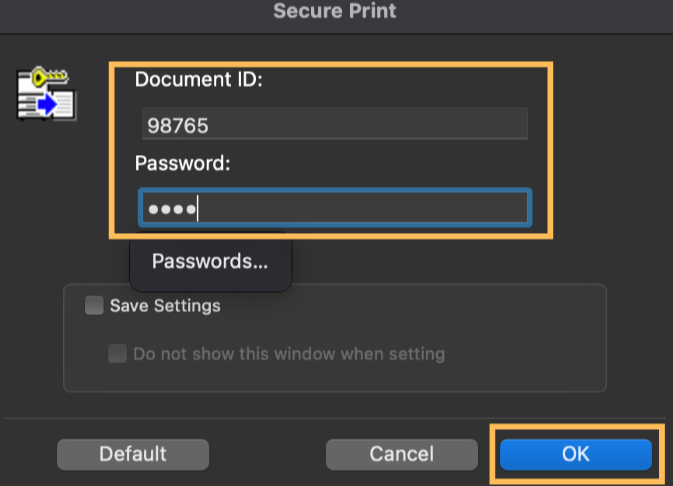
7. Choose a 5-digit code to use as the Document ID. It cannot be 12345.
The Password has to be 4 digits, you can use whatever you'd like.
Check the box next to Save Settings if you would like to keep the same password for all future documents.
Click OK.
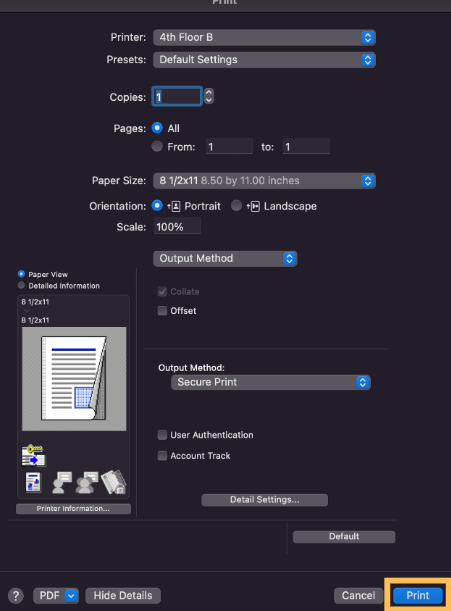
8. Click Print.
9. Now, head to the printer you were printing to.
Enter your print/copy code.
If you do not know what your print/copy code is, please contact your PI or Angela Janacek.
10. Click on User Box.
11. Click on System.

12. Click on Secure Print.
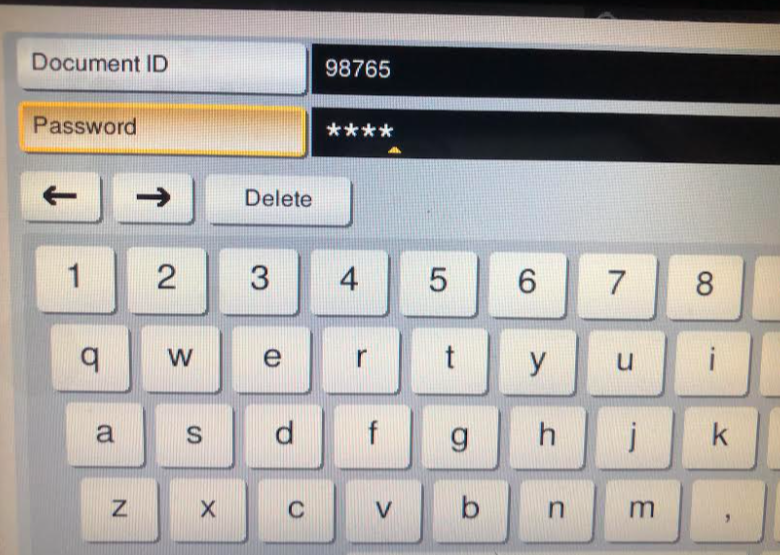
Here, you will find a screen to enter your Document ID and the Password you created in the previous steps.
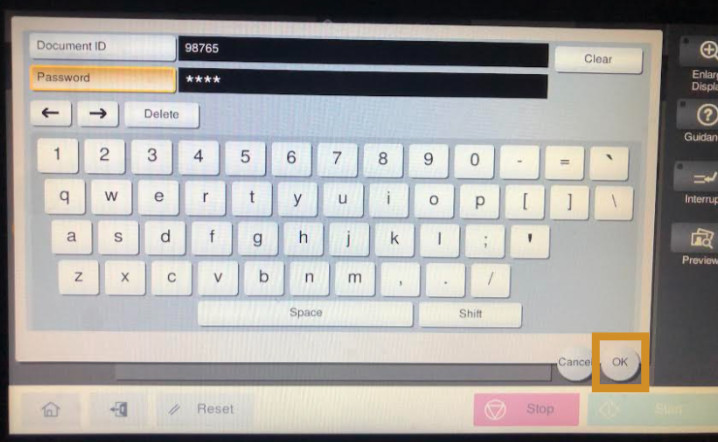
13. First, enter your 5-digit Document ID.
14. Then enter your 4-digit Password.
NOTE: Make sure to click on the word "Password" in order to enter any digits.
15. Once you have both entered, press OK located in the bottom right corner of the screen.
On this next screen you will find the document that you are printing.
16. Press Select All.
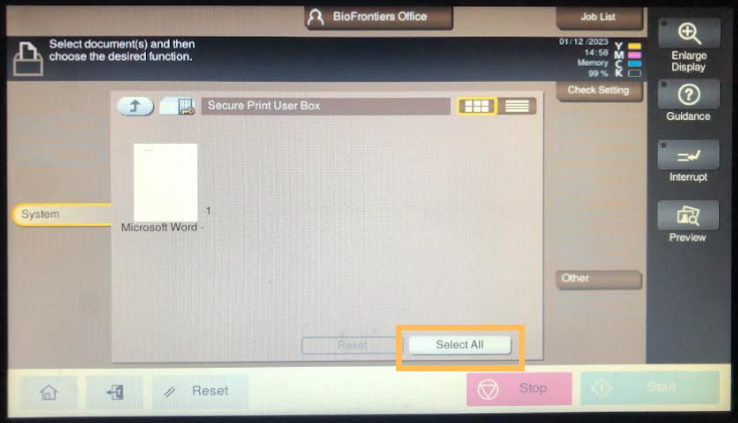
This will highlight the document that will be securely printed:
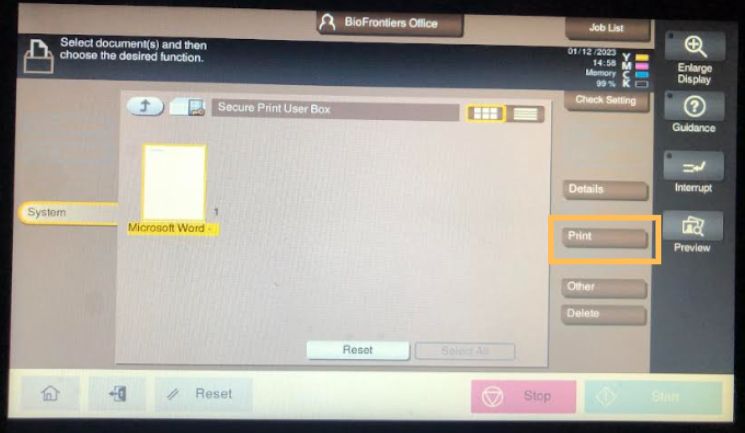
17. Click Print located on the right side of the screen.
18. Click Start on the right bottom corner to start printing your document.
19. Pressing start will bring you to this screen and your document will begin printing.
Adding E-Mail Address to Printer - From Web
From the Web
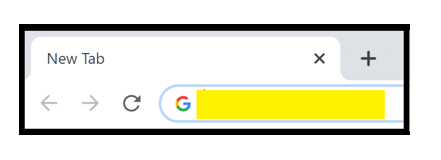
- Open a web browser of your choice. For this example, we used Google Chrome. At the top of the browser in the URL, enter the IP address of the printer you wish to add the user’s email address to.
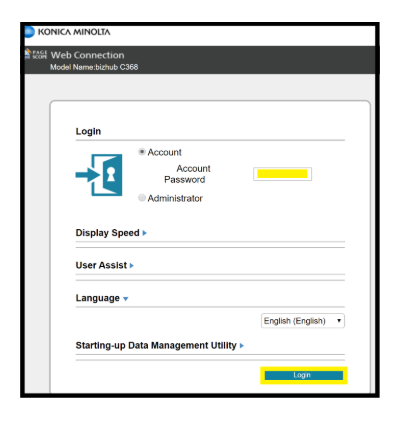
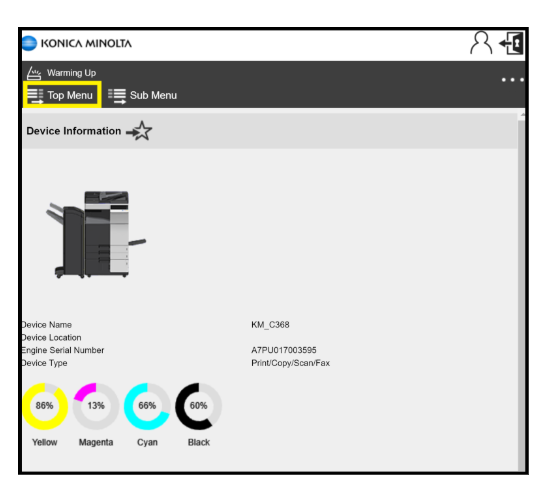
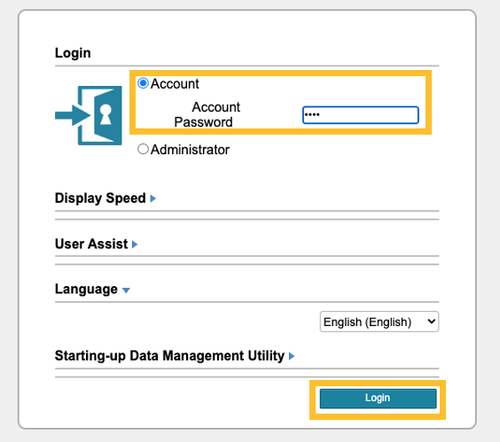
2. You will be redirected to the following page. Enter the Account Password. This is your 4-digit print/copy code and click Login.
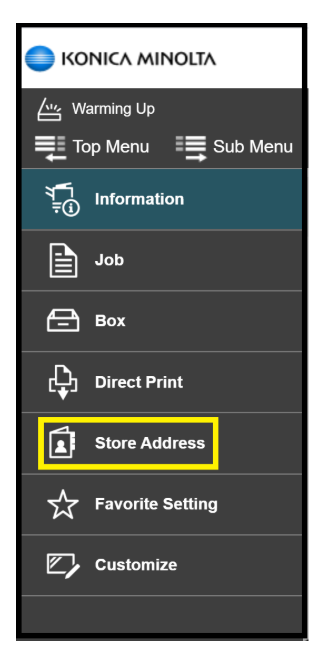
3. On this page, you will navigate to the top left and click Top Menu.
4. In the pop-out menu, click Store Address.
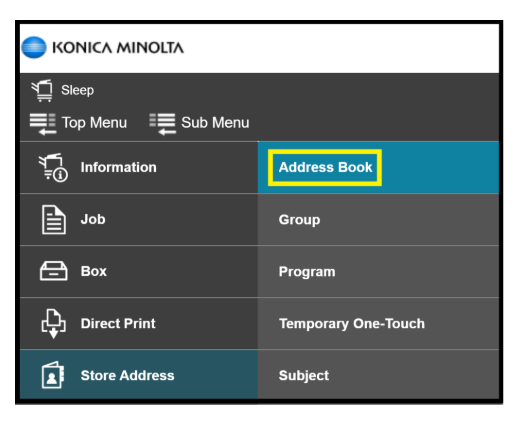
5. In the second pop-out menu, click Address Book.
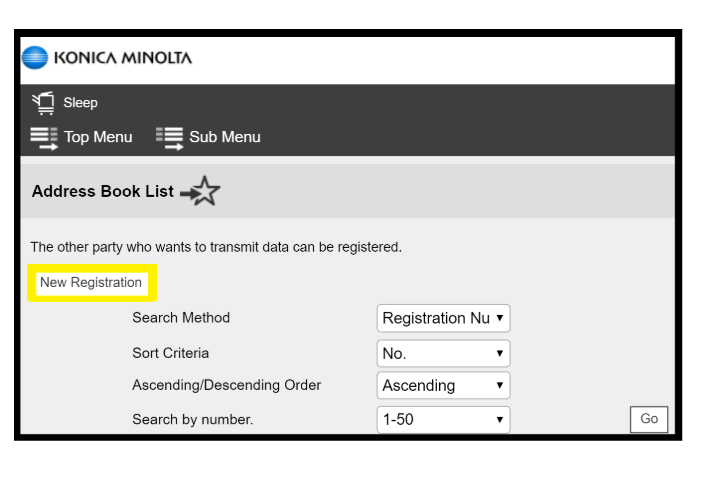
6. On the following page, click New Registration.
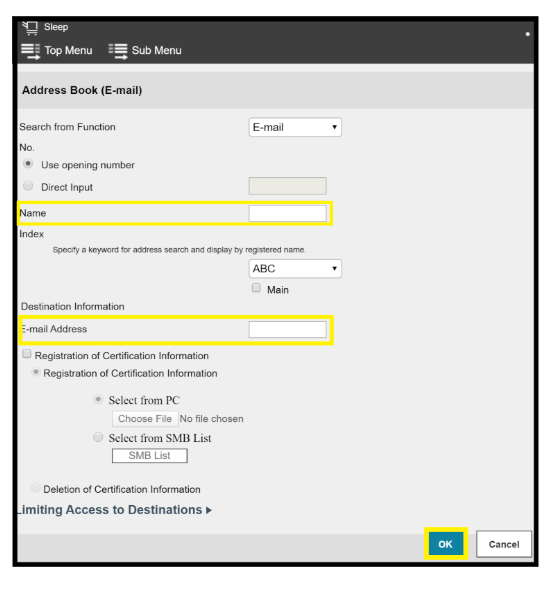
7. You will be directed to a page to search for the person. Enter the user’s name and email address and click OK.
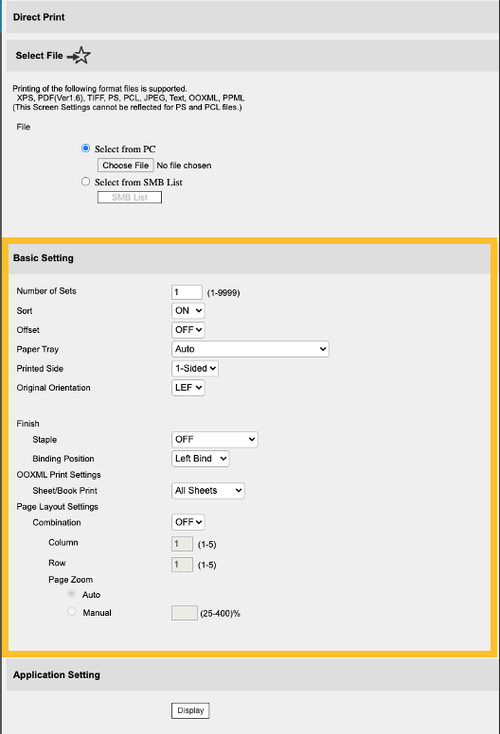
Direct Print
NOTE: Before beginning, please ensue you are connected to the network via UCB Wireless or Ethernet connection.
- Select the IP Address for the printer you want to print to. Then, open a browser window, type in the IP Address in the address bar, and hit Enter.
| Printer/Device Location | IP Address |
|---|---|
| 1st Floor A | 172.21.16.7 |
| 2nd Floor A | 172.21.17.8 |
| 2nd Floor D | 172.21.21.8 |
| 3rd Floor A | 172.21.18.8 |
| 3rd Floor D | 172.21.22.8 |
| 4th Floor B | 172.21.19.8 |

2. You should now see a Konica Minolta login page. Select Account. In the Account Password field, enter your copy code.
Then, select Login.
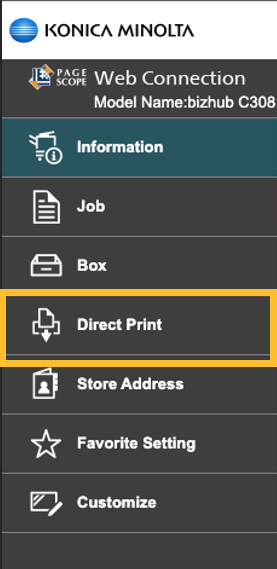
3. On the left-hand side, select Direct Print.
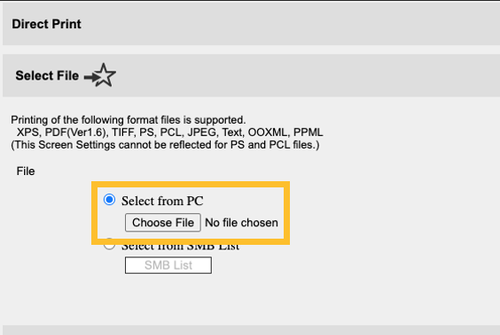
4. Select Select from PC then select Choose File.
Choose the file you'd like to print.
5. Then, select your desired settings in the Basic Settings section.
6. Once you've uploaded the file and selected your desired settings, select OK in the bottom right corner of the screen.
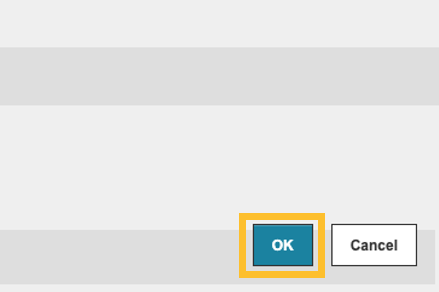
7. Your file should be at the printer.
If you need to print another file, select OK and return to Step 4.
