Last updated Mar 11, 2024 12:12 PM
Poster Printing
On This Page:
The BioFrontiers poster printer is back in service!
Basics
Hours of Operation: Monday - Friday, 9AM - 4PM*
*Hours are limited beginning October 2, 2023.
Posters are printed on a "first in, first out" basis.
You need to send 5 things to jscbbposters@colorado.edu:
- The poster in PowerPoint and PDF formats.
- If your poster file is too large to send via email attachment, please use the CU Large File Transfer service to send us the poster.
- The dimensions of the poster in inches.
- Method of Payment. We accept a SpeedType or Money Order. If paying with SpeedType, please provide us with it in your email request. If paying by Money Order, please provide it at time of pickup.
- The business purpose of your poster. If the poster is for a conference, please specify the name of the conference.
- Your lab association.
BIT must be given at least a 48 hour notice that you want a poster printed by a certain time and date- be sure to include the poster file in your request. Request to print MUST be submitted during our Hours of Operation.
If your print request is received outside of Hours of Operation, it will be considered submitted on the next business day.
Please be on time to your scheduled pickup appointment.
The team that prints posters is also responsible for providing Desktop Support to BioFrontiers and AV support for JSCBB, therefore we are not always in the office.
We are not responsible for verifying resolution quality or poster formatting before printing. If you are not satisfied with the resolution of your images or the formatting of your poster after it has been printed, you are responsible for the payment of a second poster.
Pricing
At the moment we are able to print posters on vibrant luster paper, with a maximum size of 44 inches for one of the sides. Any poster that you wish to be printed must have one side of size 44 inches or less. For example, a 72” by 44” poster is possible, but not a 60” by 72”.
Our posters are priced depending the amount of color in the poster:
- White Background: those with less images and less color block
- $7.00 per square foot
- Color Background: those with more images and color blocks
- $8.00 per square foot
- Maximum Poster Dimensions: 44" X 72"
This is determined by the majority of your poster background. A few color pictures on a white background will still be charged at the white background price. If you have any questions regarding the cost of your poster, please specify that you'd like a quote before proceeding with printing in your Poster Print Request E-Mail.
We accept both University SpeedTypes and Money Orders at this time. Money Orders must be made out to: University of Colorado.
We will not accept credit cards or cash payment, we apologize for the inconvenience.
How to Prepare Your Poster
In order for us to print your poster in a timely fashion and get it to you when you need it, there are a few things that we request.
- We need the poster sent to us at jscbbposters@colorado.edu in the form of a .pptx (Powerpoint) or a .pdf (PDF document). Either of these will work but it would be best for you to include both.
- We also need the dimensions that you would like for your poster to be printed. The most common size is a 36” tall by 48” wide poster (3 feet by 4 feet). Even if that is the size you would like, we need an explicit size from you to make sure that we print the poster you want.
- We need a payment for the poster.
- If you are using a SpeedType please include it in the email.
- If you are paying by Money Order, please say so in the email. We require that you make the Money Order out to University of Colorado. We also require you to have the Money Order with you at the time of pickup.
- We do not accept credit cards or cash at this time. Sorry for the inconvenience.
- Please include the business purpose of your poser. For example, will your poster be used for a retreat, poster session, conference, etc.?
In order for you to get your poster on time, we ask that you send it or give notice of intent to print at least 48 hours in advance of when you would like it printed. This gives us time to plan accordingly.
If you do not give a 48 hour advance notice for printing a poster, BIT can not guarantee that your poster will be printed at the time requested.
After we have printed your poster, we will reply to you letting you know that it is ready to be picked up.
If you have any further questions feel free to email us at jscbbposters@colorado.edu or in person in room D222.
Below you will find more detailed instructions for creating your poster:
Using PowerPoint
PowerPoint is our most commonly used application for creating poster-sized documents. PPT has a maximum document dimension size limit of 60". Two of the more commonly used sizes are 36" by 48" and 36" by 56". If you wish to create a poster (in PPT) that will print larger than this, you should create a smaller document with the appropriate height-to-width ratio that will scale up proportionately. For example, to end up with a poster that is 36" by 72" (height to width ratio of 1:2), size your poster in PPT to be 24" by 48" (also a ratio of 1:2). The document size can be specified in the “Page Setup” dialog.
Placing Graphics in Word Processing and Poster Documents
We often have to embed pictures of various kinds into documents. These guidelines outline the best
file formats to use and the best techniques for getting your graphics from the application in which you
created them to your word processing or poster document. This should help you obtain the best quality
printed results.
There are two general kinds of graphics files, bitmaps and vector or object-based. A bitmap picture
is a rectangular matrix of dots (pixels) where each dot is a single color. When a bitmapped picture is
printed a certain size the printed picture can be described as having a certain resolution, or number of
dots per inch (dpi). If a picture is 1000 pixels wide and is printed 5 inches wide the horizontal resolution
in dpi is 1000/5 or 200 dpi. Examples of bitmaps are digital photographs and scanned pictures of
graphs or drawings. Vector or object-based graphics files are composed of mathematical descriptions
of the object and letter shapes that make up the figure. The concept of resolution in dots per inch
does not apply to them, and when printed they will print at the maximum resolution of the printer being
used. It is possible to insert bitmapped objects into vector based graphics files, and these inserted
bitmapped objects follow the rules as other bitmapped pictures. Examples of vector/object based
graphics are graphs from most graphing packages and drawings created using programs like Adobe
Illustrator.
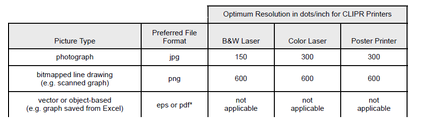
This following table shows the optimal resolution to use for the various graphics file types when printing.
* Older versions of Microsoft Office (2003 and earlier for PC and 2004 and earlier for Mac) do not handle pdf graphics
properly, so you should use eps files for inserting graphics into these programs.
Using Bitmaps
In order to get the best quality print from a bitmap file while keeping the size of the
file to a minimum, the size of the pixels or dots should be matched to the size of the dots that the
printer uses. Most black and white laser printers are capable of printing at 300 or 600 dots per inch
(dpi). B&W lasers cannot print shades of grey (e.g. photographs) so they must print black dots with
the density of the non-overlapping dots determining the darkness of a region. This makes it so the optimum
resolution for photographs is lower. The color laser can print dots of any color at 300 dpi. The
poster printer is an inkjet printer that can print 1200 dpi using eight different colors of ink. Thus to print
colors that are combinations of the eight “primary” colors it must use an area of non-overlapping dots
of the primary colors plus the white of the paper. We have determined that the quality of printed photographs
does not improve significantly beyond about 300 dpi in the original image. Using higher
resolutions will make your file much larger without significant improvement in the printed picture quality.
However if you have a picture for a poster in which fine detail is very important, you might try scaling
it to 600 dpi.
The preferred file format for photographs is jpg because this format utilizes compression algorithms
that reduce the file size substantially without noticeably reducing the quality of the picture. Information
is lost during this compression and during scaling so you should keep your original photo file intact.
The jpg compression does not work very well for line drawings like scanned in graphs or other pictures
with high contrast sharp edges, so the preferred file format for these is png. The png file format
uses a loss-less compression scheme that works very well with line drawings. Scaling these files
down does result in loss of information so you should keep originals of these also. If the application
you are using does not support png files, a very similar alternative format is gif.
Printing images at higher resolutions than suggested in the table above will not improve significantly
the quality of printed version but will increase the size of your document file and may increase printing
time substantially.
Scaling Photographs and Other Bitmapped Images
You can use an application like GraphicConverter or Photoshop to scale photographs to match the optimal size for the printer you are going to use. The following table shows a few examples of scaling pictures to best fit the printers.
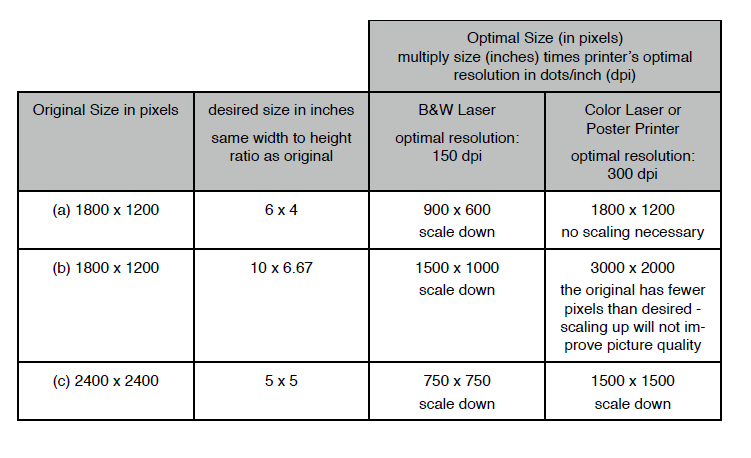
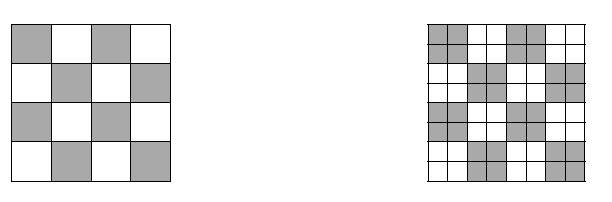
The rule of thumb to follow is that you never need to scale a picture up to a higher resolution but should scale down if necessary to bring it to the optimal resolution of the printer you will be using. If the checkerboard on the left below is your original 4 x 4 pixel graphic and you scale it up to 8 x 8 pixels, you will get the picture on the right. The pixels are smaller and the resulting file will be larger, but the picture content remains the same.
Using Vector Based Graphics
Because they contain mathematically defined shapes, vector based graphics will print at the maximum quality of the printer independent of how they are scaled in the document. While there are many file formats that are vector and object-based, the preferred format for inclusion into documents like Microsoft Word and Powerpoint files is encapsulated postscript or eps. With newer versions of Microsoft Office programs (2007 or later for PC and 2008 or later for Mac) you may use pdf files instead. They are generally simpler to make and can be inserted into the newer versions of Word and Powerpoint with good results. Older versions of Office programs would turn inserted pdf graphics into low resolution bitmapped graphics not suitable for publication. EPS and pdf files contain postscript printer instructions. Postscript is a computer programming language that is used to describe text and graphics on a printed page. It is built-in on almost all laser printers. With eps files the postscript instructions are “encapsulated” with additional information that that makes them easier to insert into other documents. Many applications cannot display the graphics represented by the postscript instructions within an eps file unless the file includes a “preview” representation.

The preview included in an eps file may not be a very high quality representation of the graphics but the postscript will be used when the document is printed. The resulting printed picture will be at the highest quality the printer is capable of producing. Many graphics applications allow you to create eps or pdf files directly by selecting options under “Save As...” or “Export...” menus. If the application you are using to produce your vector/object-based graphics does not support saving files as eps, then you can use Adobe Acrobat (the standard or pro version, not the free Acrobat Reader) to create the eps file but first you must save the graphics as a pdf file. On the Macintosh (OSX) there is a “Save As PDF...” button in the standard “Print...” dialog. On a PC you can use the free PDFCreator software http://sourceforge.net/projects/pdfcreator/) or the “PDFmaker” printer selection that comes with Adobe Acrobat. Once you have the pdf file, open it with Adobe Acrobat and use the options in the “Save As...” dialog to create the encapsulated postscript file. In later versions of Adobe Acrobat the “Settings...” button in the “Save As...” dialog also allows you to designate that the eps file include a preview image. While these procedures somewhat complicate the process of placing graphics into documents, they will guarantee that you get the best quality output on the printers in CLIPR.
Inserting Pictures into Documents
While it is tempting to simply use “copy and paste” to move graphics from the application you used to create them into the application you use for word processing or posters, this does not guarantee a good quality printed document. It is best to save the graphics out into the appropriate file format as described above, and then use menu commands to insert the picture file into the document. Most applications will allow you to “drag and drop” the picture file into the document, but is some cases this is the same as the “copy and paste” method and does not guarantee good quality results. In Microsoft Office applications select Insert ➙ Picture ➙ From File... from the menus which will bring up a dialog in which you locate and select the picture file. If you want the convenience of using “copy and paste” or “drag and drop” insertion of pictures into documents, then you should first test this technique using a small document on the printer you will be using for your final copy.